Adding Codes & Metrics
ADD CODES & METRICS
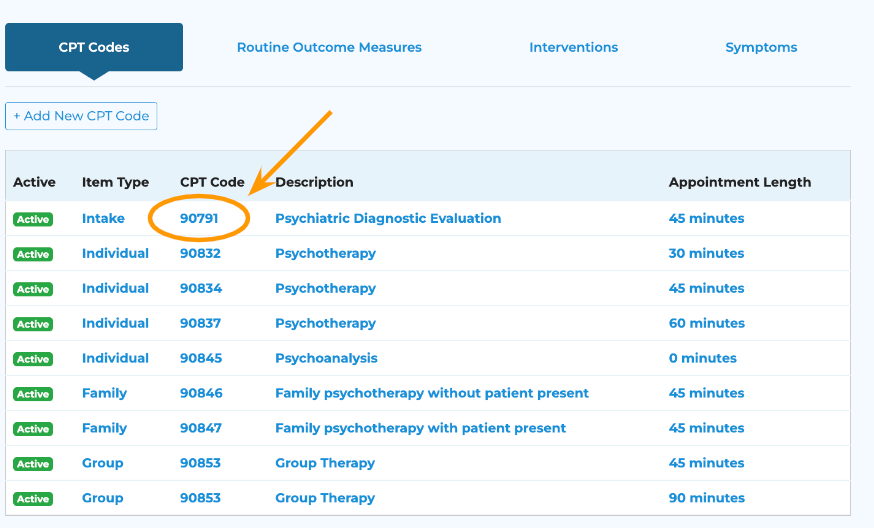
STEP 1: Navigate to the CODES & METRICS tab within the Account Settings section.
STEP 2: Review the default codes (picture below) to see which ones need to be added for your practice.
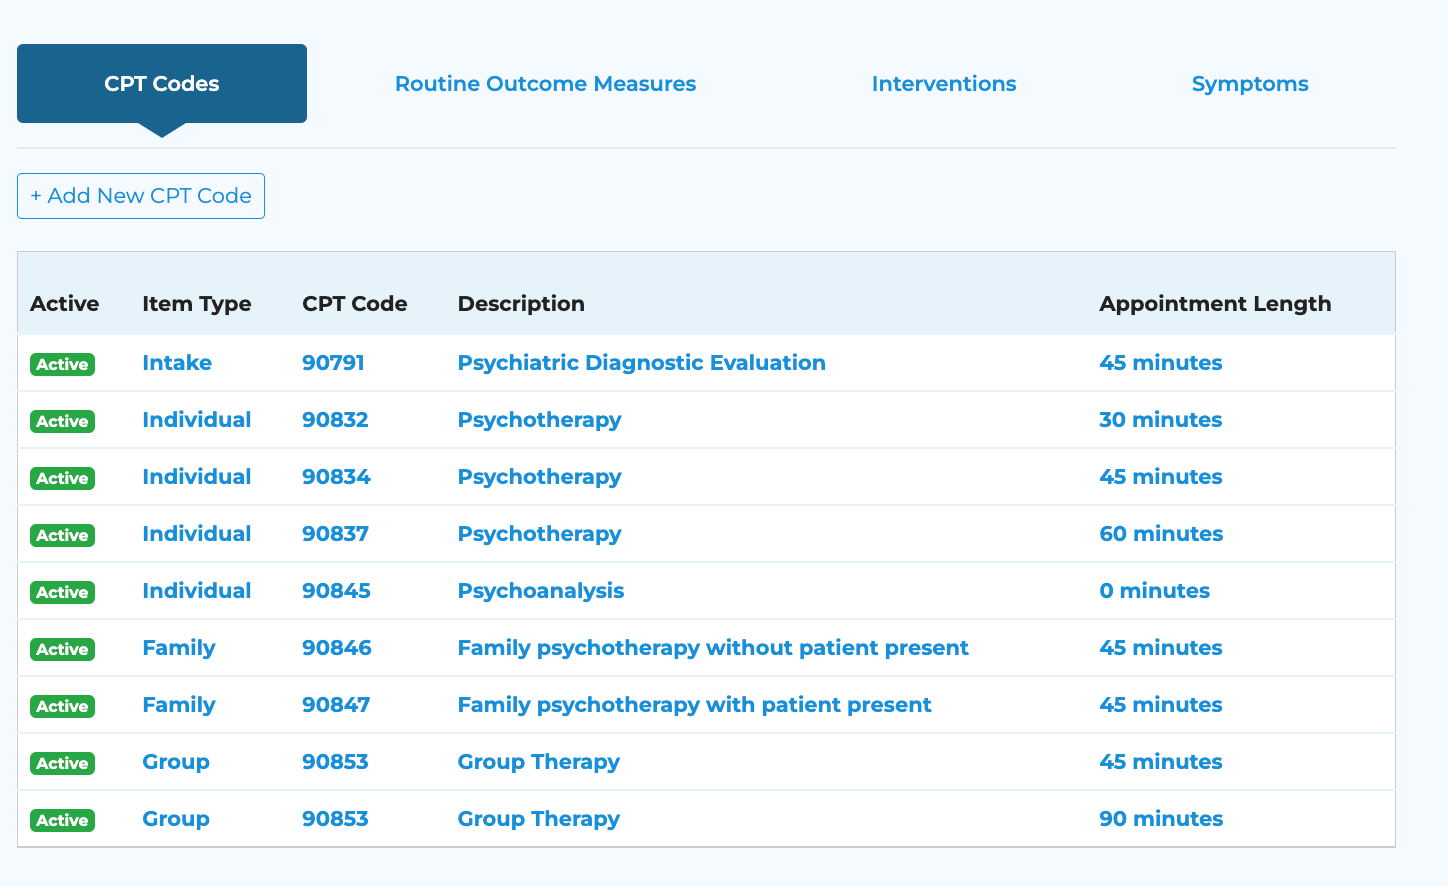
STEP 3: You can edit the current codes to have alternative descriptions and/or appointment lengths or you can make any unnecessary ones inactive by clicking on the CPT code within the list.
STEP 4: Add any additional CPT codes by clicking on the +Add New CPT Code button.
● Service Type → Select the appropriate service type from the dropdown (Intake, Individual, Family, Group) or click on the (New) button to create your own service type.
○ The service type distinction is how the CPT codes will be organized in the dropdown when creating an appointment.
● CPT Code → Enter the CPT code that you’d like to add to your account.
● Description → Enter a description for the CPT code.
○ This description is used to help your staff select the correct code when creating their appointments. This description will not appear on the superbills.
● Length (minutes) → Enter the typical duration of an appointment with this CPT code.
○ When selecting this CPT code from the dropdown within the appointment creation window, the duration of the appointment will automatically reflect whatever length was entered here (note: the duration can always be adjusted as needed).
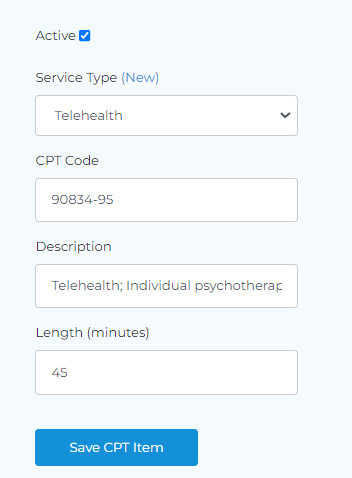
STEP 5: Create telehealth codes using the appropriate modifier code (e.g., -95, -GT).
● For practices that conduct telehealth sessions, you’ll want to create additional CPT codes that include the proper modifier code in order to accurately create superbills and/or submit e-claims.
○ First, create a new service type by clicking on the (New) button and then label the service type something such as “Telehealth” or “Teletherapy”

● Once you have created the “Telehealth” service type, click +Add New CPT Code
○ Service Type → select “Telehealth” from the dropdown
○ CPT Code → Enter the regular CPT code followed by the appropriate modifier (e.g., -95, -GT)
○ Description → Add another differentiator before the code’s description such as “Telehealth; Individual psychotherapy”
○ Length (minutes) → specify the default duration for this type of appointment
STEP 6: Review list of global Routine Outcome Measures (ROMs) and add additional ones as needed.
● Within the Codes & Metrics tab, click on the Routine Outcome Measures header.
● Review the list of global ROMs available for immediate use.
● Click +Add New Routine Outcome Measure button to input your own.

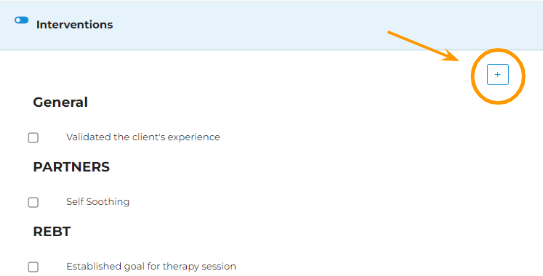
STEP 7: Review list of global Interventions and add additional ones as needed.
● Within the Codes & Metrics tab, click on the Interventions header.
● Review the list of global Interventions.
○ For any that you would like to activate, click on the name of the Intervention and then click the “Active” checkbox.
○ By clicking the “Default” checkbox, these interventions will automatically populate for selection within the session notes (see example below).


● For active interventions that do not have the “Default” checkbox selected, you will be able to add them to specific session notes by clicking on the + button within the note’s interventions section (example below)

● To add new interventions to your account, click on the +Add New Intervention button and fill out the pertinent fields.
○ Intervention Type → The list of current intervention types will populate in the dropdown.
■ If you would like to create a new intervention type for selection, click on the (New) button.
○ Intervention Description → This is the description of the intervention that will appear on the session note.

STEP 8: Review the global Symptoms list and add additional ones as needed.
● Within the Codes & Metrics tab, click on the Symptoms header.
● Review the list of global Symptoms.
○ For any that you would like to activate, click on the name of the Symptom and then click the “Active” checkbox.
○ By clicking the “Default” checkbox, these symptoms will automatically populate for selection within the session notes (same as with the interventions shown above).
■ For active symptoms that do not have the “Default” checkbox selected, you will be able to add them to the session note by clicking on the + button within the Symptoms section (same as with the interventions shown above).
● To add new symptoms, click on the +Add New Symptom button and fill out the pertinent fields.
○ Symptom Type → The list of current intervention types will populate in the dropdown.
■ If you would like to create a new symptom type for selection, click on the (New) button.
○ Symptom Description → This is the description of the symptom that will appear on the session note.

Related Articles
Adding Diagnosis Codes
Step 1: Navigate to Account Settings - Codes & Metrics. Step 2: Select the Diagnosis tab on the right-hand side. Then, choose +Add New Diagnosis. Step 3: Select the type of diagnosis from the dropdown. Then, add the code, modifier (if required), and ...Adding Metrics to a Client Chart
Step 1: Navigate to the client’s Metrics tab within their chart. Then, select + Add Routine Outcome Measure. Step 2: Choose the ROM you would like to chart. Then, add the date of the ROM. The value will go in the last box. Step 3: Now, you can view ...Adding/Editing CPT Codes
STEP 1: Navigate to the CODES & METRICS tab within the Account Settings section. STEP 2: Review the default codes (picture below) to see which ones need to be adjusted and/or added for your practice. STEP 3: You can edit the current codes to have ...Adding Diagnosis Codes
STEP 1: Navigate to the “Diagnosis” tab within the desired client’s profile STEP 2: Under the Treatment Methods heading, click on the Select Diagnosis Code drop down Begin typing the code/description in the search bar If the diagnosis is not ...Adding a Client
Step 1: select the Add Client button at the top right. Step 2: complete all of the necessary information to enroll your client. To quickly add a client to the system you only need their name. Uncheck “Enroll in Client Portal” See Enrolling Contact in ...