Comprehensive Onboarding Packet
CONFIGURE GENERAL ACCOUNT SETTINGS
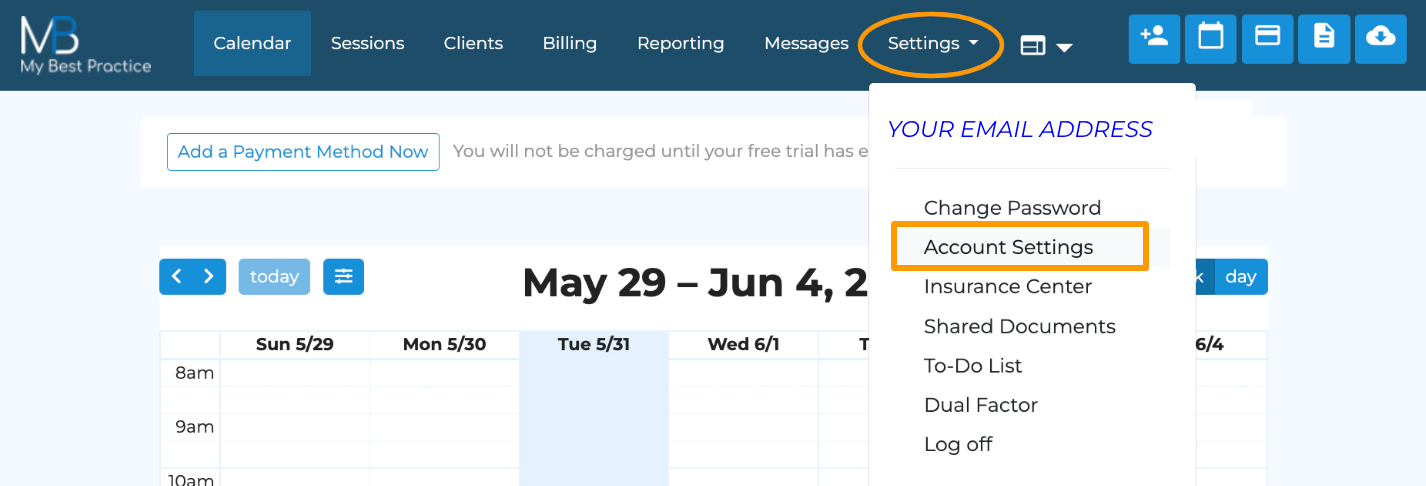
- Complete the DEFAULT tab fields
- Time Zone → This will be the default time zone for all staff members’ calendars.
- Enable Appt Reminders/Days Before
- Check this button if you’d like your clients to be able to opt into appointment reminders via text.
- Note: each client will need to activate appointment reminders for themselves within their portals.
- Enter the number of days prior to the scheduled appointment that you’d like for your clients to receive the text reminders.
- Example Text Reminder:
- Enable Autopay (notification emails)
- Check this button if you’d like staff members to receive a confirmation email of all auto-pay transactions due to be charged each evening.
- In the text field, include the email address of the user who should receive the transaction list for ALL auto-payments due to be charged each evening.
- Note: If you’d like users to receive only their list of auto-pay transactions, you can configure this elsewhere within their staff profiles.
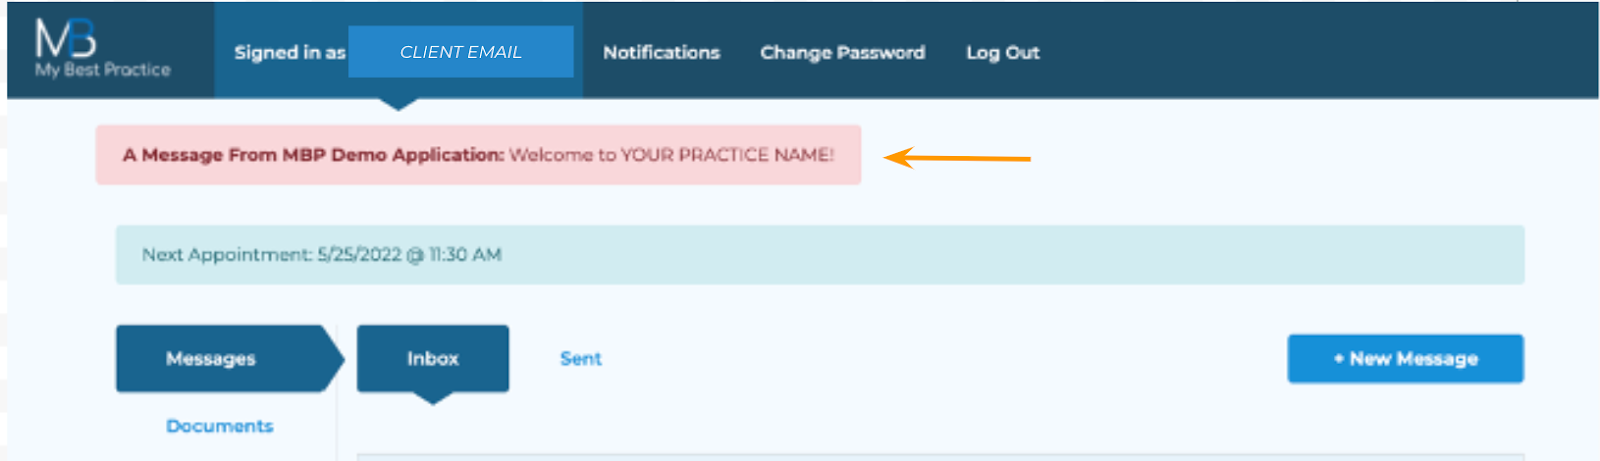
- Client Portal Banner Message
- If you would like for all clients to receive a default message upon logging into their client portals, enter the message here.
- Here is an example of how it will appear within the client’s portal.
- Session Timeout (minutes)
- For security purposes, enter the desired duration of inactivity (in minutes) before your staff is automatically logged out of the system.
- Adjust settings within the Invoices tab
- Invoice Display Billing Address (Default)
- Leave this button checked if you would like for your clients’ superbills/invoices to reflect the billing address of your practice.
- Invoice Display Facility Address (Default)
- Leave this button checked if you would like for your clients’ superbills/invoices to reflect the specific facility address selected during the appointment creation.
- Adjust settings within the Clinical tab
- Select the appropriate options from the various dropdowns
- Note: these will be the default settings for all clinicians’ notes, but they can select an alternative for each specific client note.
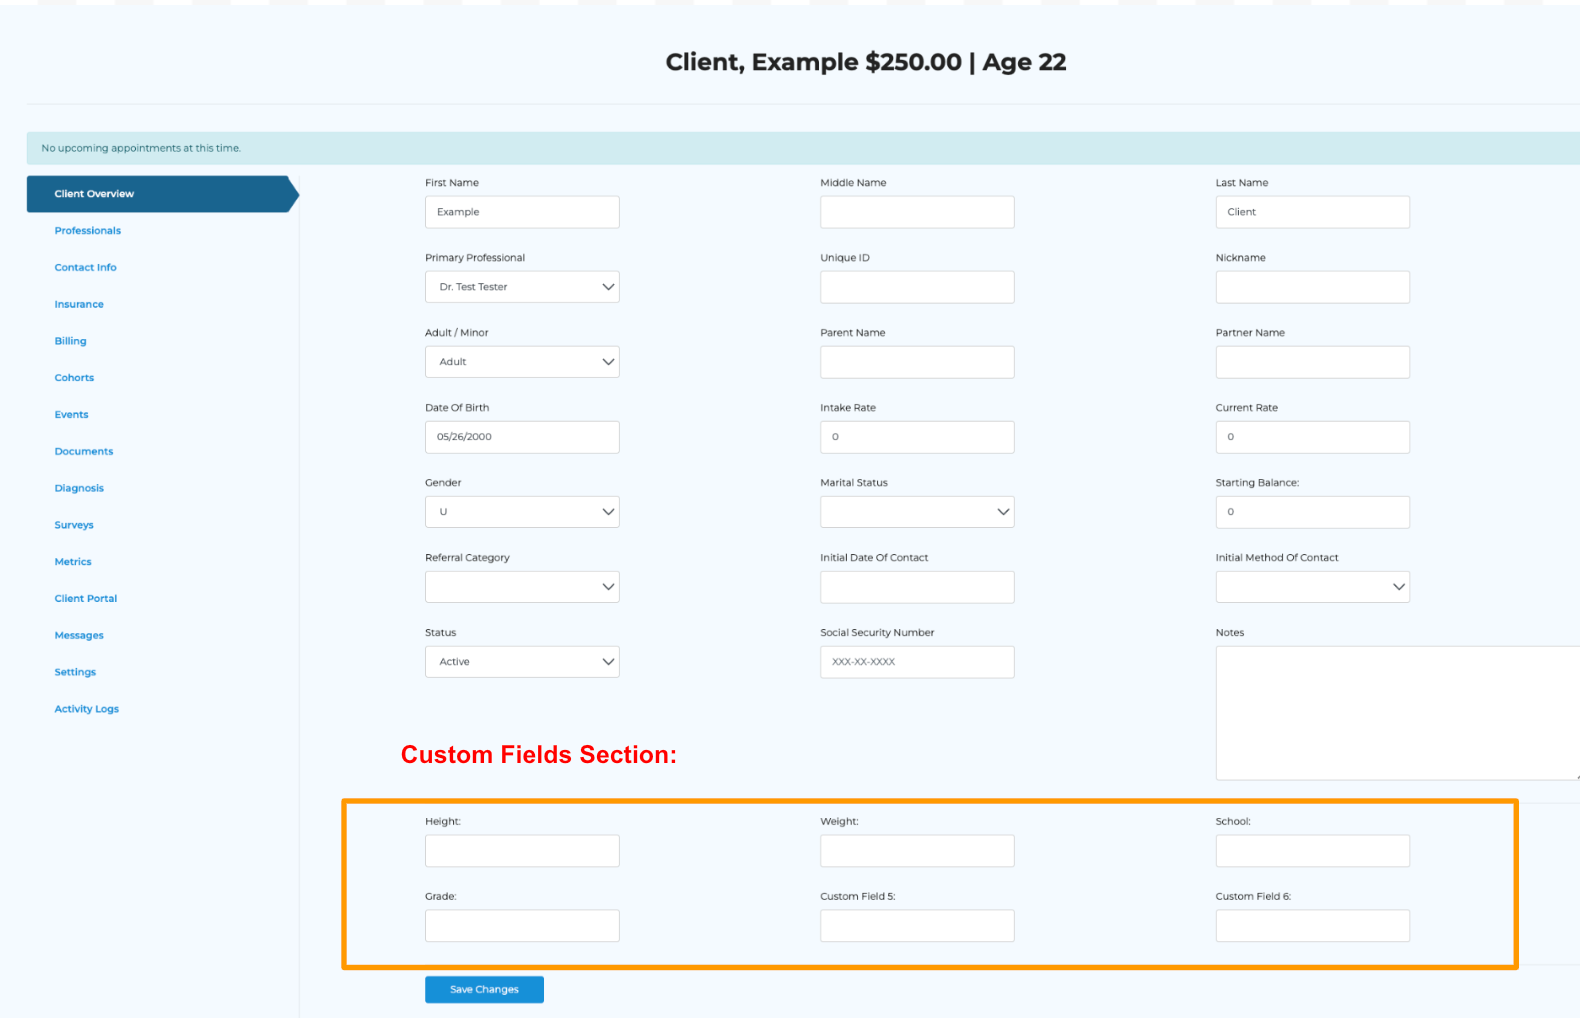
- Create custom client information fields within the Custom Fields tab.
- You can customize up to 6 additional fields to be added to your clients’ profiles.
- Enable Groups & Cohorts within the Advanced tab
- Check the boxes to enable groups and cohorts for your practice.
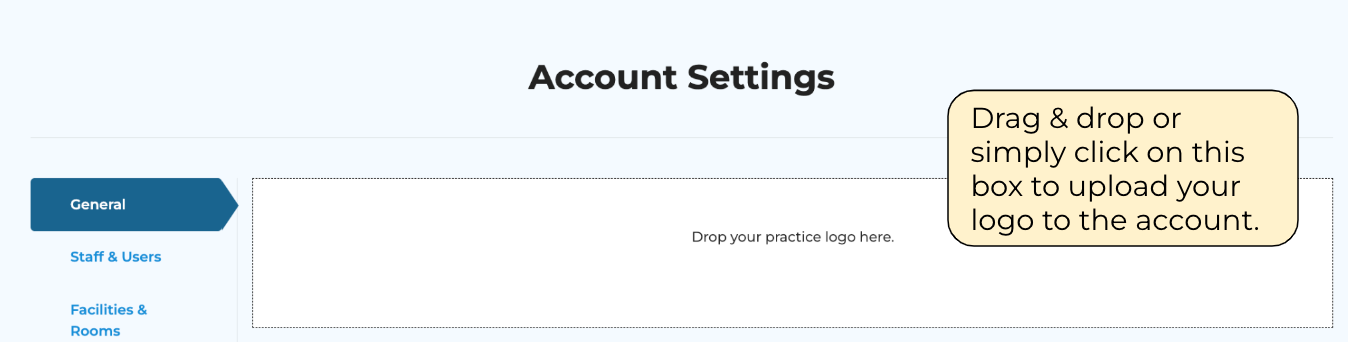
- Click on the SAVE CHANGES button
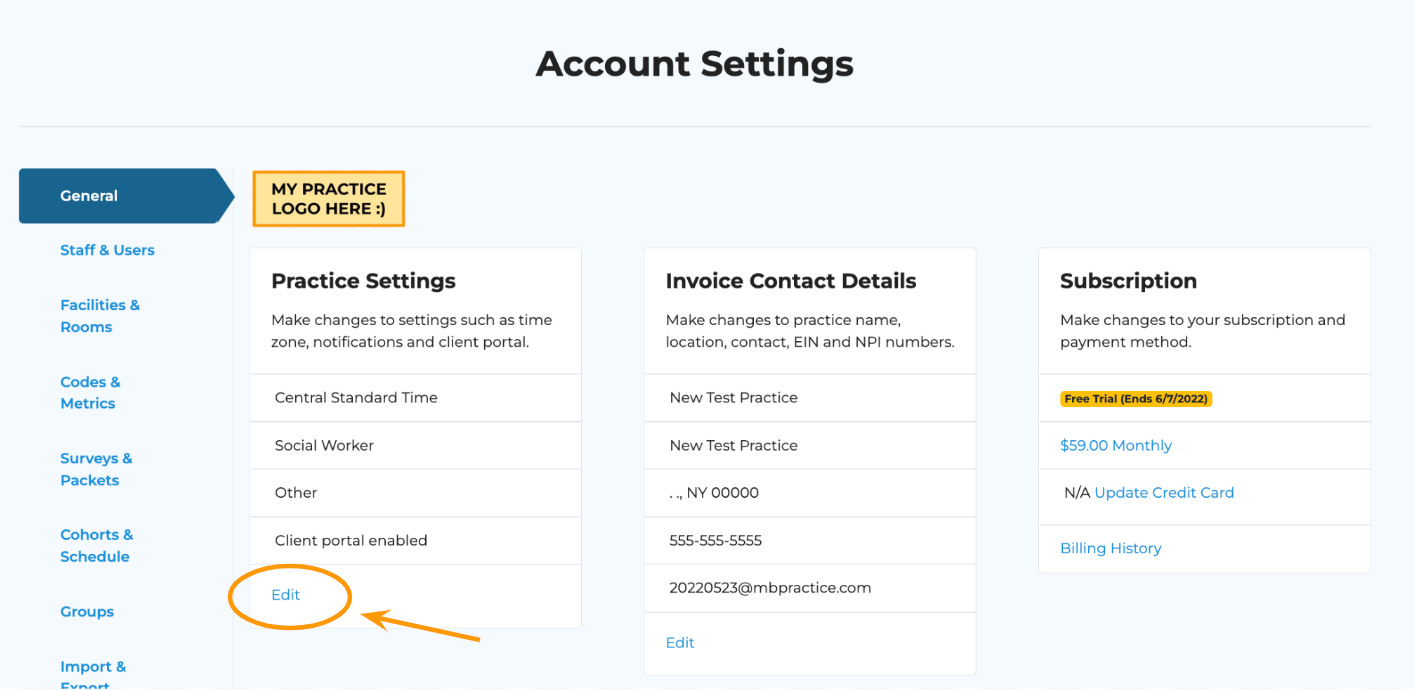
- Navigate back to the “Account Settings” section and click on the “Edit” button on the “Invoice Settings” bucket within the General tab.

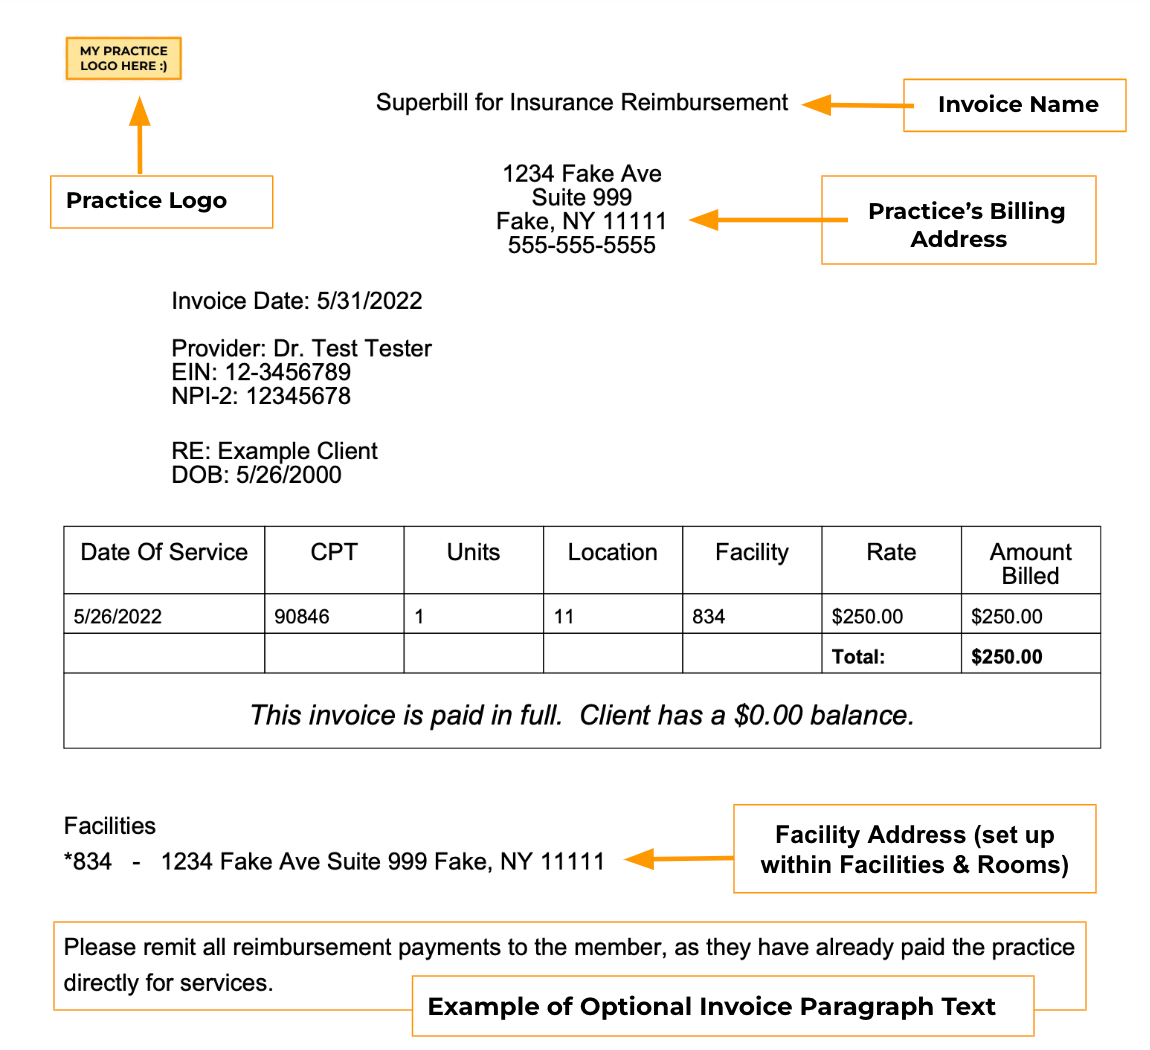
- Fill out all pertinent fields as you’d like them to be listed on your clients’ superbills.
- Practice Name → This is the name your clients will see when receiving portal invitations and messages and it is the name that will be listed on your session note export.
- Invoice Name → This field is used to add a custom title header to the top of your superbills.
- Phone Number, Fax Number, Email Address, and Address → These fields all pertain to your practice’s billing address and main contact information.
- Note: additional facility addresses can be added within the “Facilities & Rooms” tab of the account settings section.
- Practice NPI → This is also referred to as your NPI-2.
- Note: individual clinicians’ NPI-1’s can be added in the Staff & Users tab.
- Practice EIN/Tax ID → This field is to enter your practice’s “Employer Identification Number” (also referred to as your Tax ID).
- Bottom of Invoice Paragraph → This field is used to add any custom text to the bottom of your superbills.
- Example Superbill:
SUBMIT APPLICATION FOR E-PAYMENTS
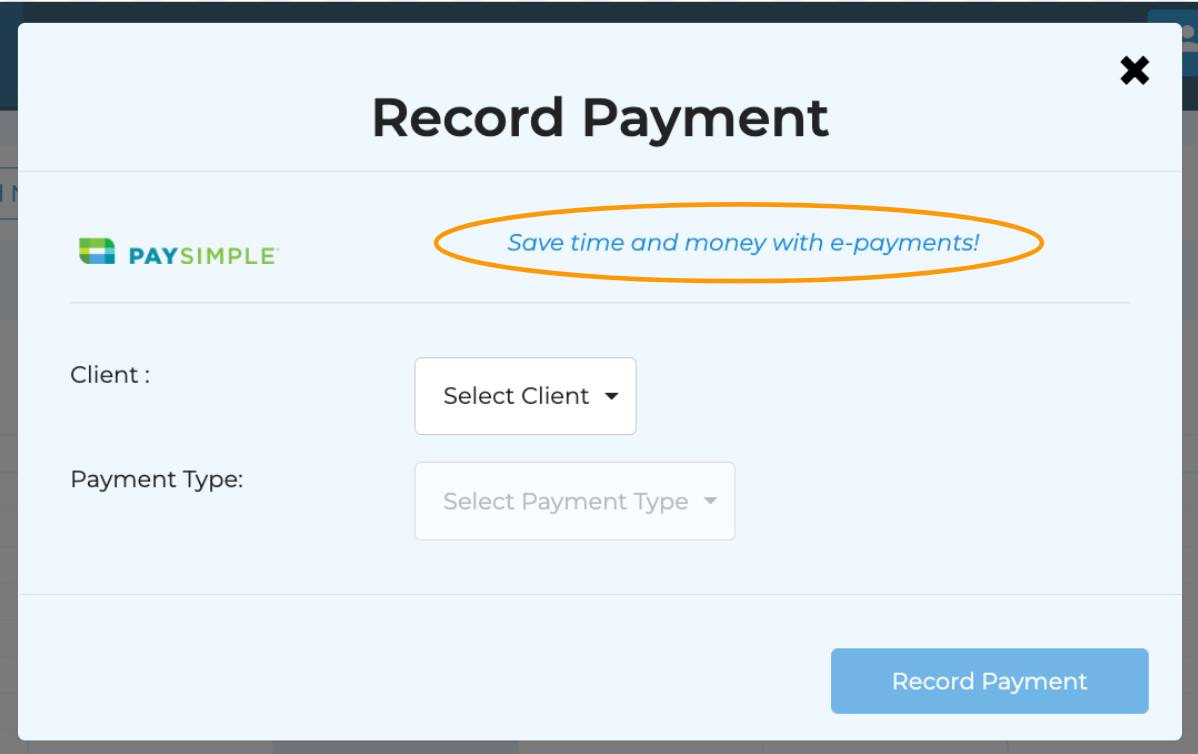
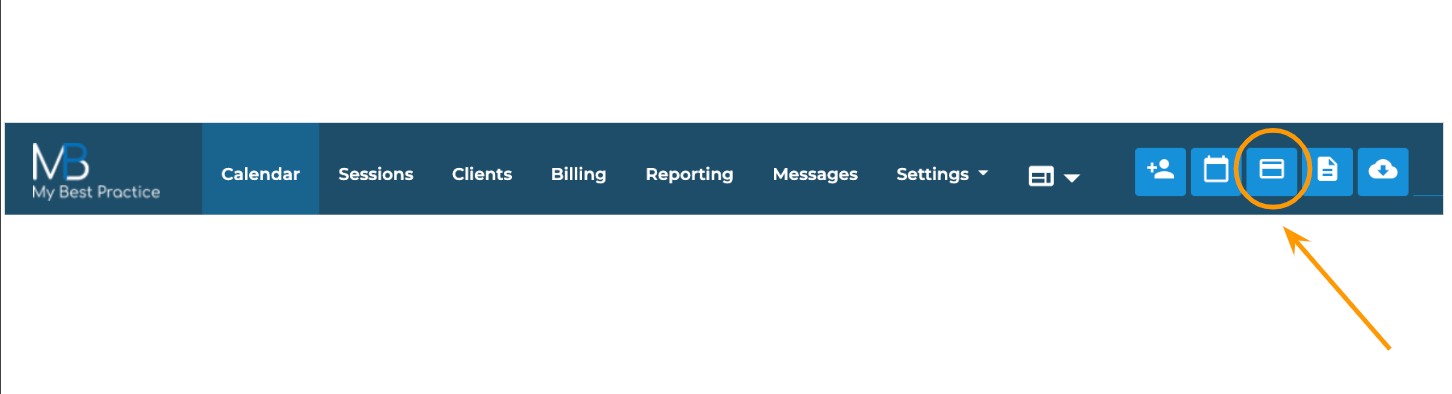
- If you are going to be using My Best Practice to collect e-payments from your clients, you will need to submit an application to PaySimple (the third-party card processor who will be servicing your account).
- In order to do so, simply click on the “Take Payment” button within the menu bar and then click on the “Save time and money with e-payments!” button to begin your application.
INVITE ADDITIONAL STAFF/USERS TO THE ACCOUNT & SET THEIR PERMISSIONS
- Professionals (additional $19/month per user)
- Schedulers, Billers, and Bookkeepers (unlimited users free of charge)
- Enter the staff member’s first and last name and the email address that they’d like associated with their account.
- The staff member will then receive an email from My Best Practice inviting them to join your account.
ADDING PROFESSIONALS
Professional tab
Active checkbox
Allows admin to inactivate professionals to revoke their access while preserving all system data.
Color → Select the color that will be used to represent the user’s appointments on the calendar.
Enrolled in Telehealth → Check this button if the user will be utilizing the telehealth feature within MBP (additional $20/month).
External Teleconference Link
If the user will not be using MBP’s telehealth service, enter the link to the user’s preferred telehealth service (Zoom, Google Meet, Doxy, etc.).
Note: If the user provides a unique meeting link for each client, do not enter anything here, as this information will be sent to all clients in their appointment reminders.
NPI # → enter the professional’s individual NPI number (NPI-1)
License # → enter the professional’s license number here
Supervisor & Supervisor License # → if the professional is under supervision, include the name and license number of their supervisor here.
Session Note Type, Treatment Plan Type, Intake Interview Type, Case Conceptualization → You can choose to override the default practice settings here for a specific professional.
Client Portal Message → This will add an additional banner message on the portals for only this professional’s clients
Salary → You can enter the professional’s salary amount here for your reference.
Signature → The user can press the “Sign Here” button to have their signature saved to the system to be added on session notes and superbills.
Autosign Session Note → by clicking this button, the professional’s session notes will be automatically signed upon completion.
Settings & Permissions tab
Notify user when client messages arrive → this will automatically be checked off for new professionals.
Enable basic or full administrator access
Basic administrator access will allow users to access all data (including all client and staff profiles, schedules, and billing information), but they will not be able to make changes to the account level settings.
Full administrator access will allow users to access all data AND make changes to account level settings.
Select additional professionals for users to have access to
By selecting professionals from the list that populates, this user will be able to view all of the other professionals’ clients, schedules, and billing information.
NOTE: This is most often used for supervisors to access their supervisees’ caseloads.
Default Billing tab
This tab is recommended for use if the professional only conducts sessions using ONE service code.
By checking the service code and denoting a billing amount, this service and service price will automatically populate on ALL new appointments created.
NOTE: If multiple service codes are selected as “Default,” they will all be automatically listed on new appointments.
Commissions tab
This tab is used to assist in conducting payroll via MBP.
You can enter the professional’s standard rate for each service and the percentage fee they should receive based on that rate.
INVITING ALL OTHER STAFF (SCHEDULERS, BILLERS, & BOOKKEEPERS)
User tab
Active checkbox
Allows admin to inactivate staff to revoke their access while preserving their system data
First and last name
Settings & Permissions tab
Notify user when client messages arrive → this will be automatically checked off for new users
Enable basic or full administrator access
Basic administrator access will allow users to access all data (including all client and staff profiles, schedules, and billing information), but they will not be able to make changes to the account level settings.
Full administrator access will allow users to access all data AND make changes to account level settings.
Select additional professionals for users to have access to
By selecting professionals from the list that populates, this user will be able to view all of the other professionals’ clients, schedules, and billing information.
If the staff member should have access to all professionals’ data, check the box for all professionals.
CREATE FACILITIES & ROOMS
- Facility Name
- Ex: Telehealth Session
- Invoice Name → Add a custom title header to the top of the superbills for this specific facility.
- Note: Enter the same invoice name from the Invoice Details settings.
- Phone Number, Fax Number, Email Address, Address
- For a telehealth facility, enter the same address from the Invoice Details settings.
- Location Code dropdown → Select the appropriate location code
- By selecting “Telehealth” from the dropdown, the proper location code will be added to superbills and e-claims for appointments with this designated facility.
- Invoice Paragraph → Same as the “Bottom of Invoice Paragraph” field within the Invoice Details settings.
- Click on the +Add Room button
- Room Name → For in-person practices with only one facility address, enter the facility name again here.
- Room Description → This description is for administrators to differentiate the rooms within each facility.
- Facility dropdown → This will default to the facility for which the room is being added.
- Color → Select a color to denote the facility when viewing the calendar by facility.
ADD CODES & METRICS
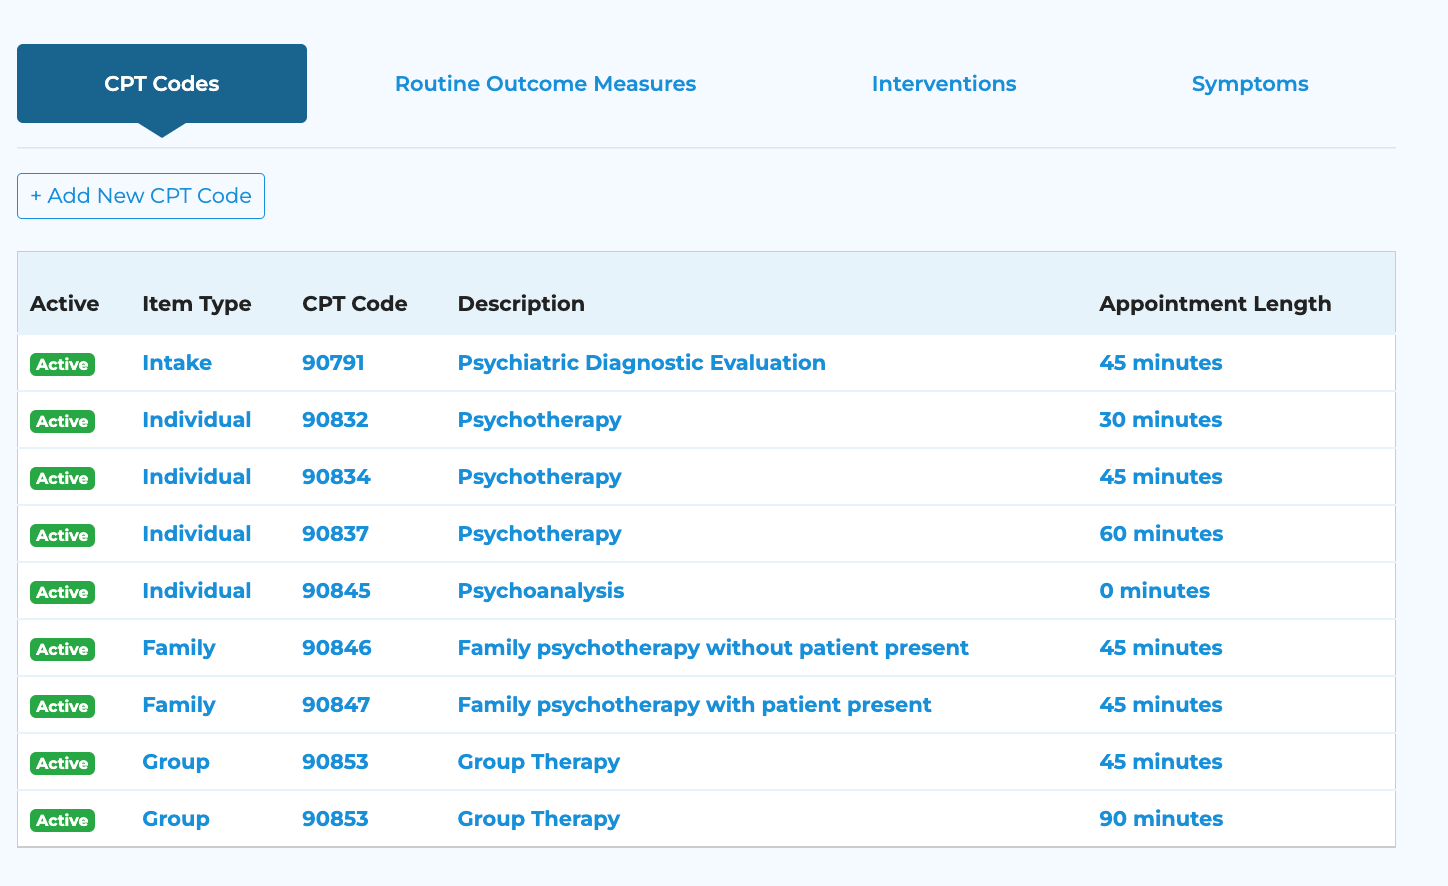
- Service Type → Select the appropriate service type from the dropdown (Intake, Individual, Family, Group) or click on the (New) button to create your own service type.
- The service type distinction is how the CPT codes will be organized in the dropdown when creating an appointment.
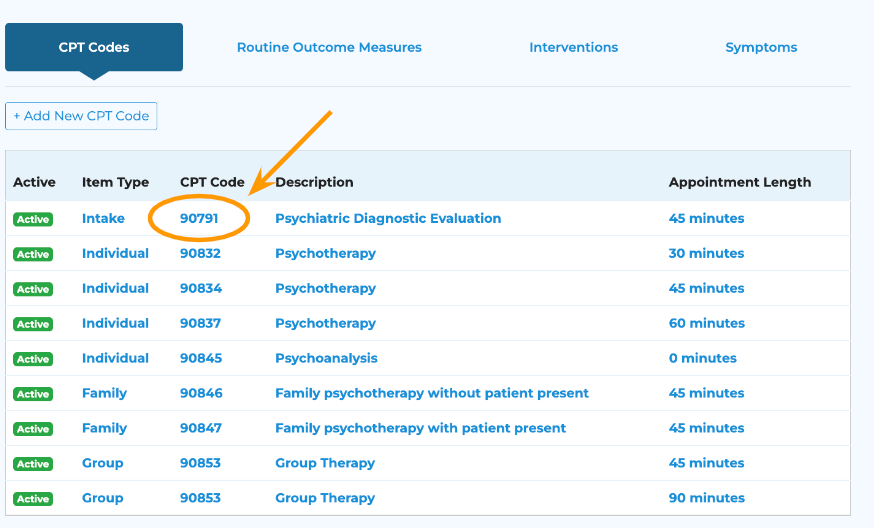
- CPT Code → Enter the CPT code that you’d like to add to your account.
- Description → Enter a description for the CPT code.
- This description is used to help your staff select the correct code when creating their appointments. This description will not appear on the superbills.
- Length (minutes) → Enter the typical duration of an appointment with this CPT code.
- When selecting this CPT code from the dropdown within the appointment creation window, the duration of the appointment will automatically reflect whatever length was entered here (note: the duration can always be adjusted as needed).

- For practices that conduct telehealth sessions, you’ll want to create additional CPT codes that include the proper modifier code in order to accurately create superbills and/or submit e-claims.
- First, create a new service type by clicking on the (New) button and then label the service type something such as “Telehealth” or “Teletherapy”
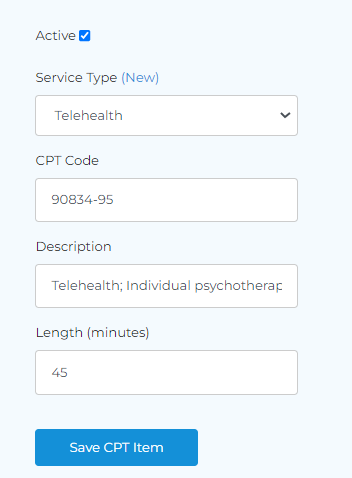
- Once you have created the “Telehealth” service type, click +Add New CPT Code
- Service Type → select “Telehealth” from the dropdown
- CPT Code → Enter the regular CPT code followed by the appropriate modifier (e.g., -95, -GT)
- Description → Add another differentiator before the code’s description such as “Telehealth; Individual psychotherapy”
- Length (minutes) → specify the default duration for this type of appointment
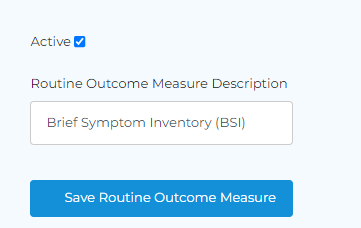
- Within the Codes & Metrics tab, click on the Routine Outcome Measures header.
- Review the list of global ROMs available for immediate use.
- Click +Add New Routine Outcome Measure button to input your own.
- Within the Codes & Metrics tab, click on the Interventions header.
- Review the list of global Interventions.
- For any that you would like to activate, click on the name of the Intervention and then click the “Active” checkbox.
- By clicking the “Default” checkbox, these interventions will automatically populate for selection within the session notes (see example below).
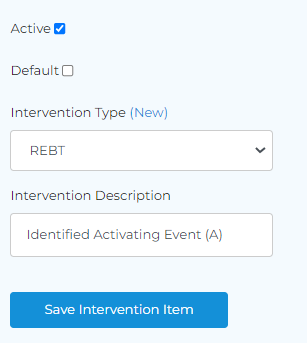
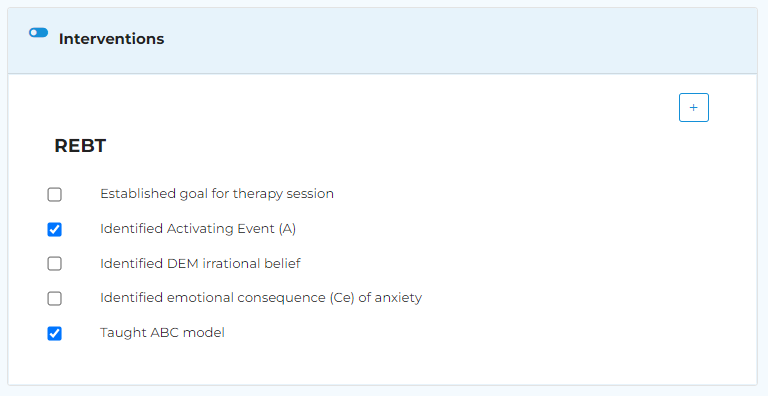
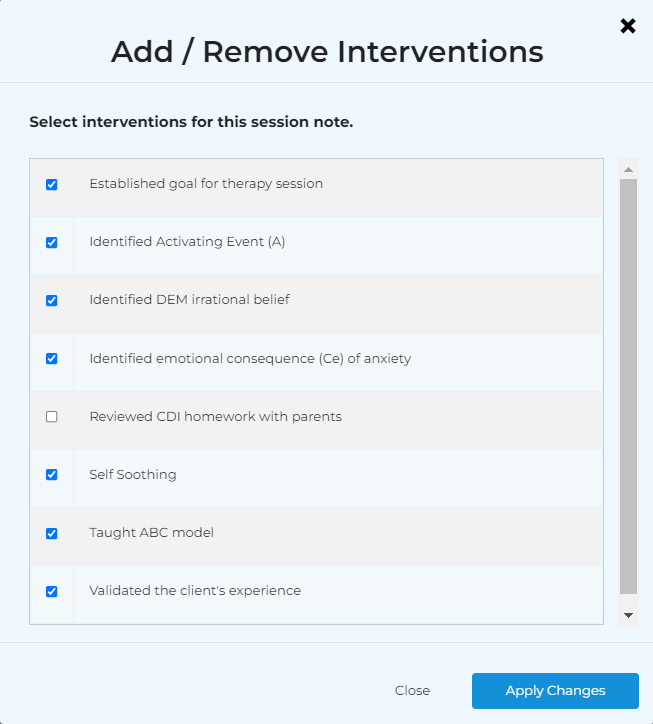
- For active interventions that do not have the “Default” checkbox selected, you will be able to add them to specific session notes by clicking on the + button within the note’s interventions section (example below).
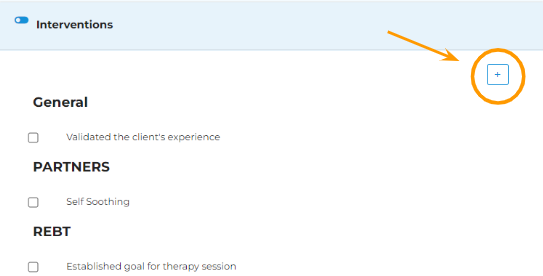
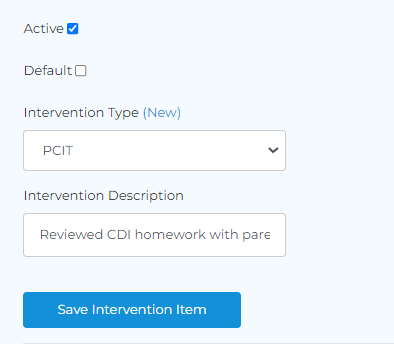
- To add new interventions to your account, click on the +Add New Intervention button and fill out the pertinent fields.
- Intervention Type → The list of current intervention types will populate in the dropdown.
- If you would like to create a new intervention type for selection, click on the (New) button.
- Intervention Description → This is the description of the intervention that will appear on the session note.
- Within the Codes & Metrics tab, click on the Symptoms header.
- Review the list of global Symptoms.
- For any that you would like to activate, click on the name of the Symptom and then click the “Active” checkbox.
- By clicking the “Default” checkbox, these symptoms will automatically populate for selection within the session notes (same as with the interventions shown above).
- For active symptoms that do not have the “Default” checkbox selected, you will be able to add them to the session note by clicking on the + button within the Symptoms section (same as with the interventions shown above).
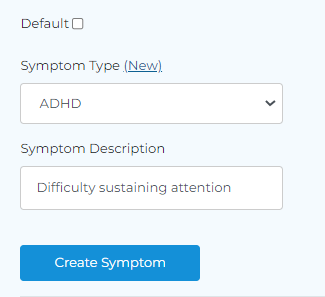
- To add new symptoms, click on the +Add New Symptom button and fill out the pertinent fields.
- Symptom Type → The list of current intervention types will populate in the dropdown.
- If you would like to create a new symptom type for selection, click on the (New) button.
- Symptom Description → This is the description of the symptom that will appear on the session note.
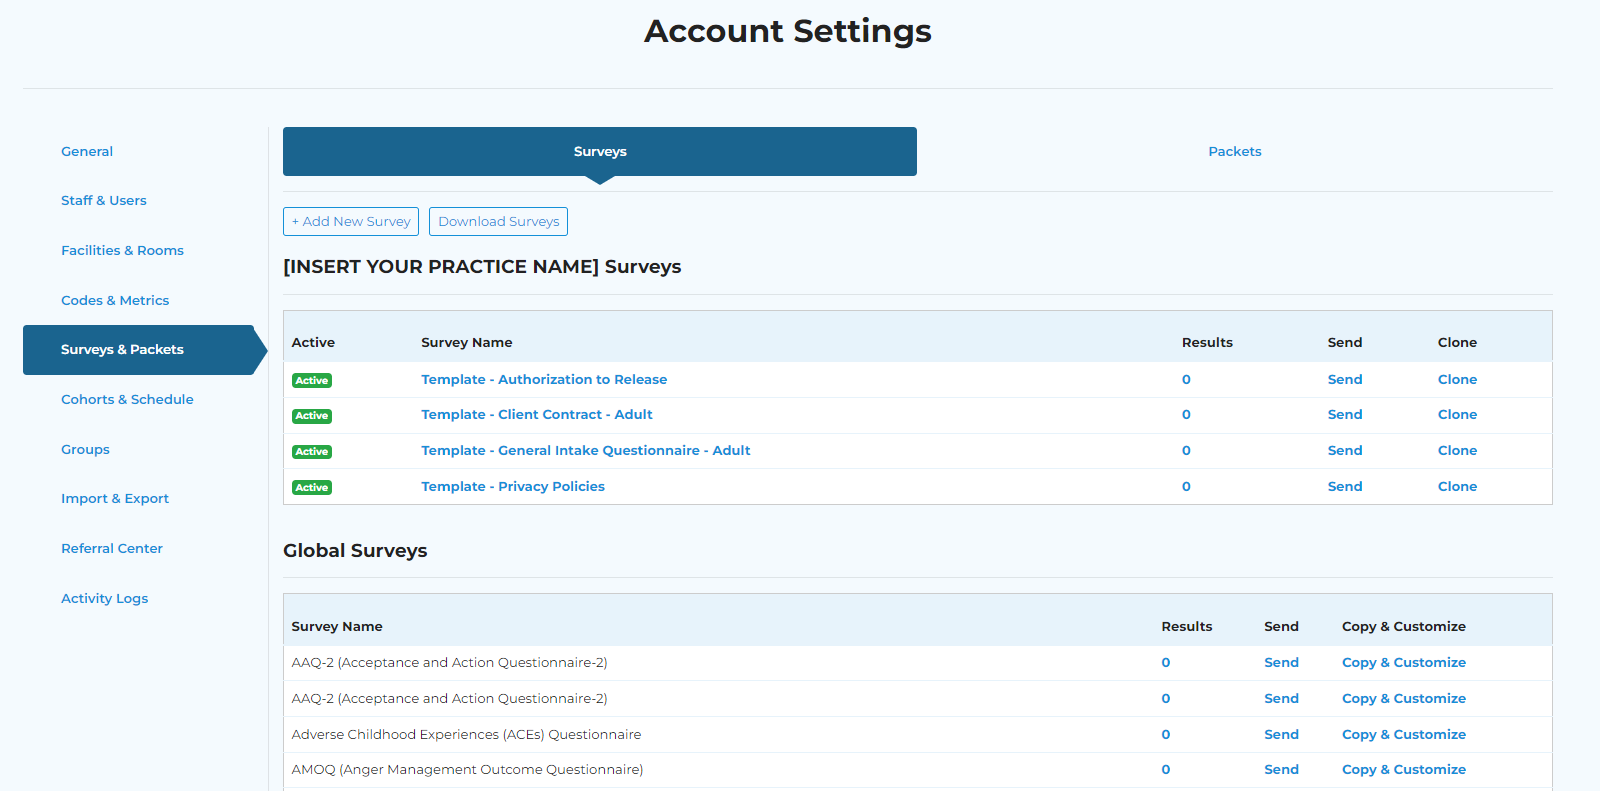
CREATE & CUSTOMIZE SURVEYS/PACKETS
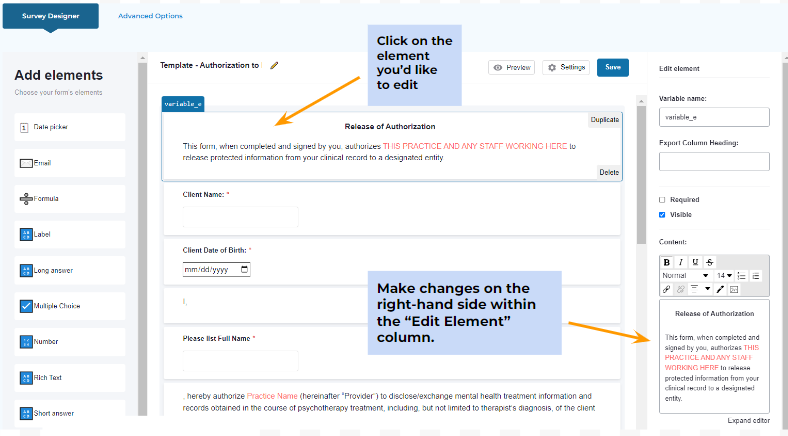
- To make changes to an element’s text, click on the desired element within the middle section, and then edit the appropriate field within the “Edit Element” column.
- Click on the +Add New Survey button and enter the new survey’s name.
- Note: The client will see the designated name of the survey when completing it within their portal.
- Click the Design Survey button to enter the survey designer tool.
- To add fields to the survey, select the desired element type from the left-hand side.
- Element Types
- Date picker → this will create a field in which the client can select a date from the calendar.
- You can choose to have the survey pre-populate with the client’s date of birth saved in their client profile by using the “System Variables” dropdown and checking “Pre-Fill from Database”
- By selecting the “Read-Only Field” checkbox, the client will not be able to edit the pre-populated date of birth.
- Email → this will create a field that will validate the information entered by the client to ensure the email is in a proper format (e.g., @gmail.com)
- You can choose to have the survey pre-populate with the email address saved in the client’s profile by using the “System Variables” dropdown and checking “Pre-Fill from Database.”
- By selecting the “Read-Only Field” checkbox, the client will not be able to edit the pre-populated email address.
- Formula → This field can be used to create custom scoring guidelines for other Multiple Choice fields within the survey.
- Label → This will create a short, bolded field of read-only text within the survey.
- Most often used to include section headers within longer surveys.
- Long Answer → This will create a field for the client to enter as much text as needed.
- Multiple Choice → This will create a field in which the user can select multiple answers from a list of options.
- Number → This will create a field in which the client can select a number by clicking on up/down arrows.
- You can set parameters for the minimum and maximum values for which the client can select and the increments in which the numbers should increase (e.g., Min Value = 5; Max Value = 50; Increments = 5).
- Rich Text Field → This will create a formattable block of read-only text within the survey.
- Most often used to create custom consent text and/or provide the client with other practice information.
- By clicking on the “Expand Editor” button, a larger window will populate to make the editing process easier.
- Short Answer → This will create a field for the client to enter a limited amount of text.
- You can choose to have the survey pre-populate with the client’s first name, last name, or phone number saved in their client profile by using the “System Variables” dropdown and checking “Pre-Fill from Database”
- By selecting the “Read-Only Field” checkbox, the client will not be able to edit the pre-populated text.
- Signature → This will create a field for the client to e-sign the survey.
- Single Selection → This will create a field in which the client can only select one answer from a list of options.
- When adding a new element, it will automatically be selected for customization within the “Edit Element” column.
- You can preview your survey from the perspective of the client at any time by pressing the button.
- You can edit the survey name within this tab at any time.
- Click the “Active” checkbox” to make this survey available for your staff to send to their clients.
- Click the “Available on Client Portal” button for surveys that should be immediately available for ALL clients within their portals.
- NOTE: This feature is most often used for consent documents that need to be completed by ALL clients (e.g., Acknowledgment of Privacy Policies).
- You can also use this feature to make various questionnaires available for clients to complete as many times as they’d like within their client portals (e.g., client satisfaction surveys, weekly therapy goals, etc.).
- When you’re done designing your survey, click the Save Changes button to return to the Surveys & Packets tab within the Account Settings section.
- Within the Surveys & Packets tab, click on the Packets header on the right-hand side.
- Click the +Add New Packet button.
- Properties tab
- Packet Name → This will be the name staff members see when sending out the packets to clients AND the name that clients will see when navigating to the “Packets” tab to complete them within their client portal.
- Packet Description → Give a brief description of what is included in the packet. Note: this description is only seen by your staff.
- Email Subject → This is the subject of the email if this packet is configured to be sent out automatically for a specific cohort.
- Email Body → This is the body of the email if this packet is configured to be sent out automatically for a specific cohort.
- Intake Packet Checkbox → Check this box if the packet you are creating is going to be sent out during the client intake process.
- The “Intake” column icons within the Clients list will update under the following circumstances:
- The intake packet has NOT been sent to a client → .X.
- The intake packet has been sent to a client → .X.
- The intake packet has been completed by a client → ✅

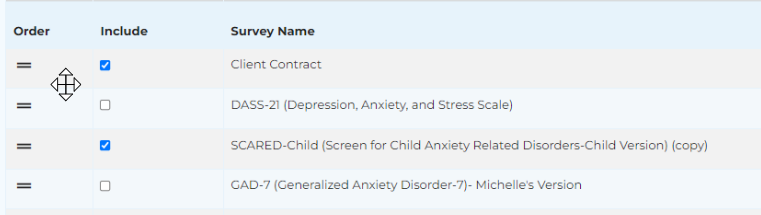
- Click on the Surveys tab on the left-hand side to select the surveys that should be included in the packet.
- You can customize the order of the selected surveys by hovering over the survey within the Order column and dragging it to the desired position.
- Cohorts can be created and used for any number of functions. Three common use-cases are listed below.
- Automatically sending out specific intake packets to different types of clients within the client creation process (e.g., Adult Intake Packet vs. Child Intake Packet).
- Creating a custom schedule for the automatic transmission of Routine Outcome Measures (ROMs).
- Sending bulk communications to a specific set of clients.
- Cohort Name → This will be the name that users see when assigning clients to a specific cohort upon client creation.
- Cohort Description → This will be the description seen by users when configuring the packet schedule and/or adding additional existing clients to a new or existing cohort.
- Click on the +Add Packet for [COHORT NAME] button to select from the list of packets that you’ve created.
- Press the Save button and you will see the packet listed in blue under the “Packet Assigned” column.
- You can add additional packets for the same cohort by pressing the +Add Packet for [COHORT NAME] button as many times as needed.
- For each additional packet, you will need to configure the transmission schedule accordingly.
- In the “Schedule” column on the right-hand side, press the Configure button to the right of the specific cohort & packet for which you’d like to set a custom transmission schedule.
- Schedule tab
- Provider Completion checkbox → check this button if the packet assigned should be completed by the provider for each client within the cohort.
- Custom Schedule dropdown → choose the parameters for when you’d like to have the assigned packets sent to the client (or the provider if the above checkbox was selected).
- One time only → upon being added to the cohort, the client/provider will receive the assigned packet to complete only one time.
- Every week on the day added → the assigned packet will be sent every week on the day in which the client was first added to the cohort.
- E.g., every Monday
- Every other week on the day added → the assigned packet will be sent every other week on the day in which the client was first added to the cohort.
- E.g., every other Monday
- Every month on the day added → the assigned packet will be sent every month on the day in which the client was first added to the cohort.
- E.g., every 10th day of the month
- Every month on the week and day added → the assigned packet will be sent monthly on the same week and day in which the client was first added to the cohort.
- E.g., the third Monday of every month
- Custom recurrence → you can choose the exact parameters (every # of days/weeks/months on the specific day of the week) for which the packet should be sent to the client.
- E.g., every 2 weeks on Mondays & Thursdays
- Scheduled End dropdown → you can either select “Never ends” or “Ends on” and then enter the specific end date.
- Reminder tab
- Remind every (in days) field → enter the schedule for which reminders should be sent for the clients to complete the assigned packets.
- Once the packet has been sent based on the specific schedule configured for the cohort, the client will receive a reminder every # of days until they have completed it.
- Maximum of field → enter the maximum number of reminders the client should receive.
- The client will stop receiving these packet reminder notifications after the designated number of reminders have been sent.
- Press the Save Changes button to be directed back to your list of cohorts.
- To add existing clients → click on the Cohort Name and then click on the Clients tab on the left-hand side.
- You can add clients by either searching for them in the search bar on the left-hand side OR you can use the dropdown to manually select from your list of active clients.
- Upon clicking on the desired client, a black check mark will appear next to their name allowing you to select multiple clients to add to the cohort at once.
- Once you have selected all of the clients you would like to add, press the Add button.
- The selected clients will populate in an alphabetical list below.
- To remove a client from a cohort, simply press the “Remove” button on the right-hand side.
- For cohorts with many clients, you can use the search bar on the right-hand side to search for clients who have already been added to the cohort.
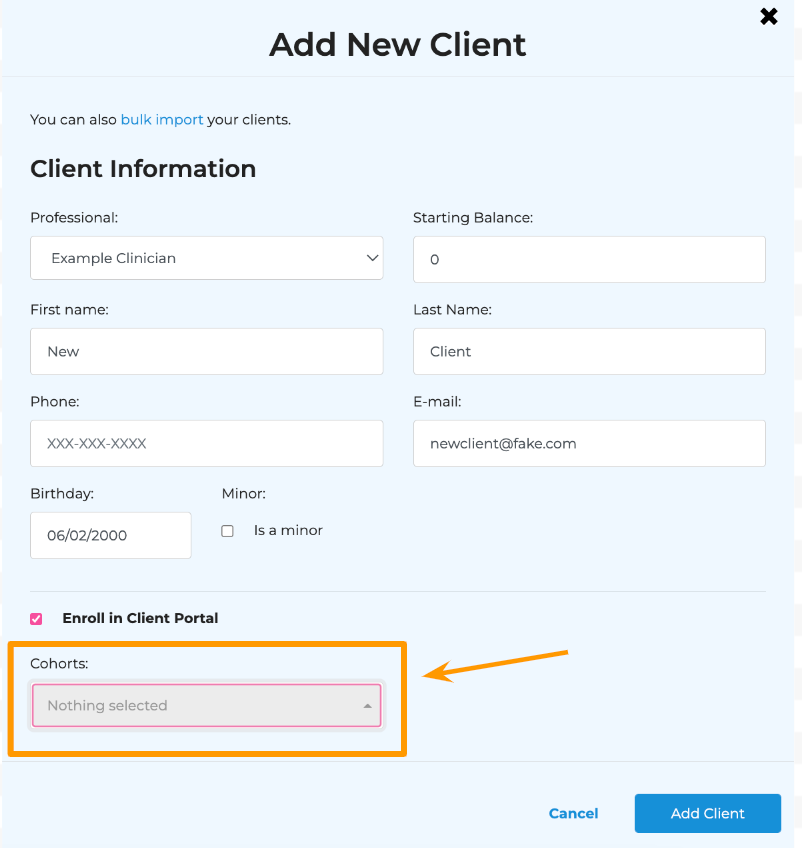
- To add NEW clients → within the client creation pop-up, you can click on the dropdown beneath “Cohorts” to select the cohorts to which you’d like to add the new client.
- This is an easy way to automatically send out intake packets to new clients!
- Group Name → This will be the name that users see when viewing the list of existing treatment groups and when scheduling group sessions.
- Group Description → This will be the description seen by users when viewing the list of existing treatment groups.
- To add clients to the group, click on the Group Name and then click on the Clients tab on the left-hand side.
- You can add clients by either searching for them in the search bar on the left-hand side OR you can use the dropdown to manually select from your list of active clients.
- Upon clicking on the desired client, a black check mark will appear next to their name allowing you to select multiple clients to add to the cohort at once.
- Once you have selected the clients you would like to add, press the Add button.
- The selected clients will populate in an alphabetical list below.
- To remove a client from a group, simply press the “Remove” button on the right-hand side.
- For groups with many clients, you can use the search bar on the right-hand side to search for clients who have already been added to the group.
Related Articles
Onboarding Worksheet
Please complete the attached onboarding worksheet prior to meeting with one of our onboarding specialists. If you would like to bulk-upload clients, please see the following Client Import Template for further instructions: Client Import TemplateCreating a Cohort to Schedule Send Packets (Intakes & ROMs)
You can create cohorts within MBP to automatically send packets on a schedule of your choosing. This is great for sending intake packets at the time of creating a client -- OR -- to send out routine outcome measures or satisfaction surveys. Step 1: ...Transition to MBP Packet
To help your clients transition from your previous EHR, we have created the "Transition to MBP" packet, which provides step-by-step instructions from the clients' perspective. The text included in the email that is sent with packet has been ...Getting Ready for MBP's Data Import
MBP understands that migrating from another EHR can be daunting, but this guide will walk you through each step to make it as seamless as possible. Step 1: Follow the instructions from your current EHR to export all of your client data. You can find ...Creating Intake Packets
Step 1: Design the individual surveys that you'd like to include in your intake packet. Directions for creating custom surveys can be found here (Designing Custom Surveys) Step 2: Navigate to the Packets tab within Surveys & Packets, and click + Add ...