Designing Custom Surveys
STEP 1: Navigate to the SURVEYS & PACKETS tab within the Account Settings section.
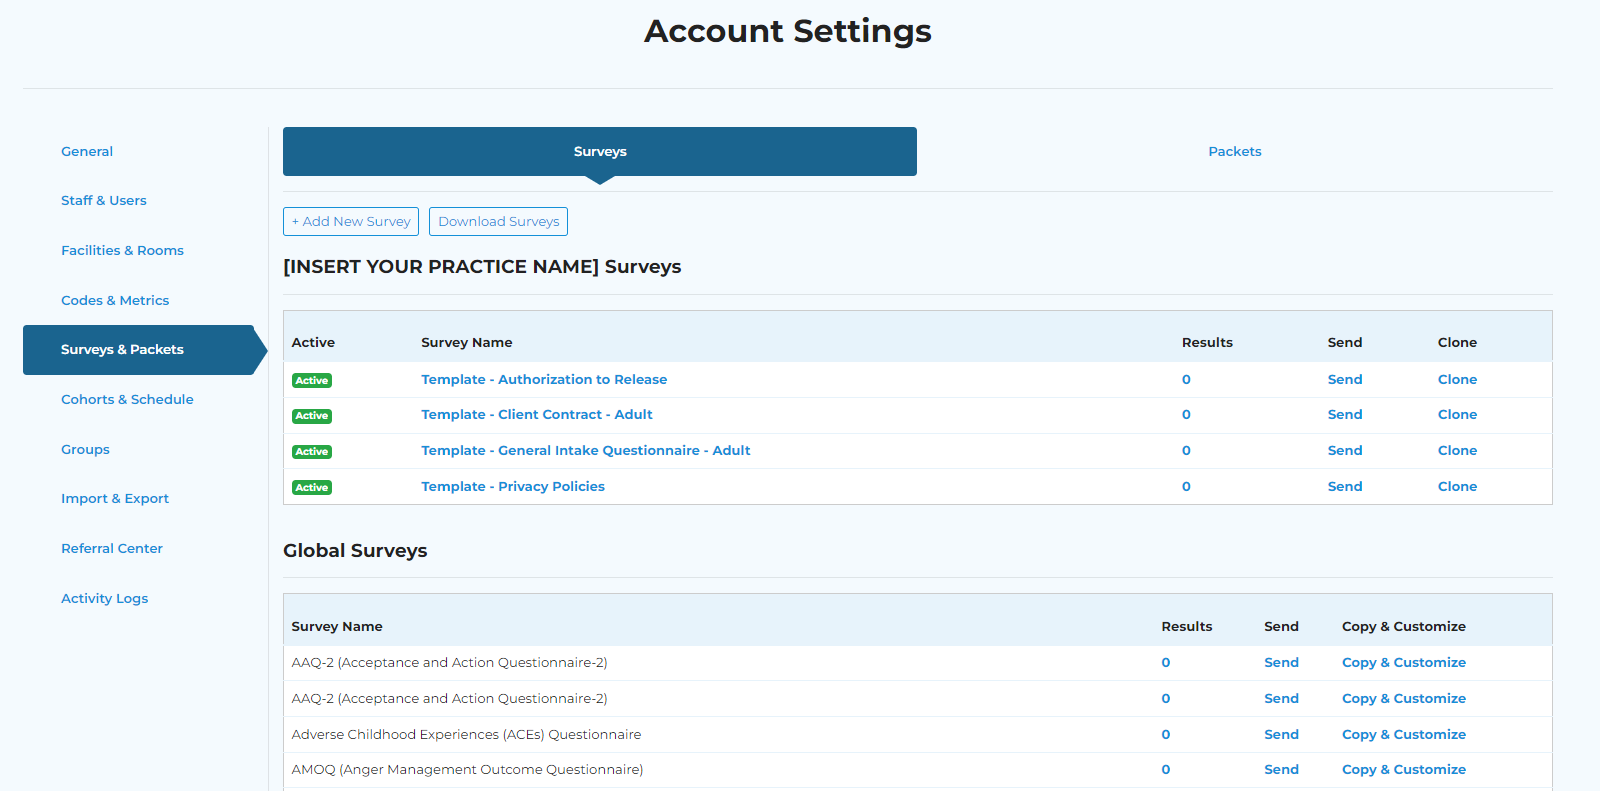
STEP 2: Customize the pre-made consent form/intake questionnaire templates to reflect your practice’s details and needs by clicking on the Survey name.

NOTE: If you choose to use the available templates, you’ll need to custom them to reflect your practice details. The text that needs to be updated will be RED.
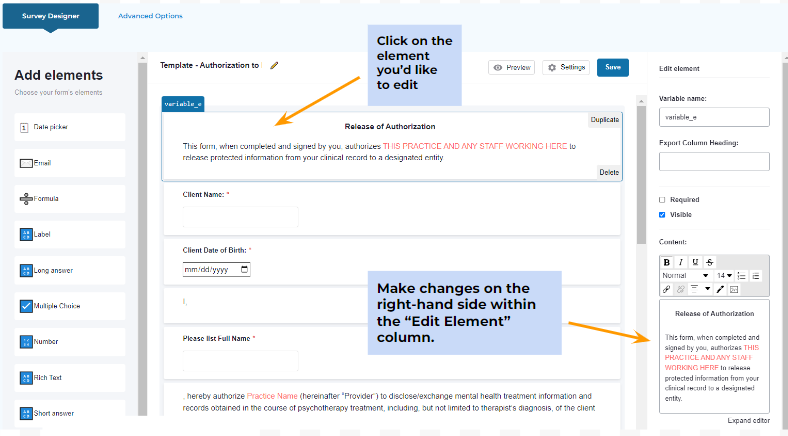
To make changes to an element’s text, click on the desired element within the middle section, and then edit the appropriate field within the “Edit Element” column.
STEP 3: Create your own surveys from scratch.
RECOMMENDATION: Press the SAVE button often when designing your surveys in case you need to unexpectedly leave the design session and/or accidentally navigate away from the screen.
- Click on the +Add New Survey button and enter the new survey’s name.
- Note: The client will see the designated name of the survey when completing it within their portal.
- Click the Design Survey button to enter the survey designer tool.
- To add fields to the survey, select the desired element type from the left-hand side.

Element Types
- Date picker
- This will create a field in which the client can select a date from the calendar.
- You can choose to have the survey pre-populate with the client’s date of birth saved in their client profile by using the “System Variables” dropdown and checking “Pre-Fill from Database”
- By selecting the “Read-Only Field” checkbox, the client will not be able to edit the pre-populated date of birth.
- Email
- This will create a field that will validate the information entered by the client to ensure the email is in a proper format (e.g., @gmail.com).
- You can choose to have the survey pre-populate with the email address saved in the client’s profile by using the “System Variables” dropdown and checking “Pre-Fill from Database.”
- By selecting the “Read-Only Field” checkbox, the client will not be able to edit the pre-populated email address.
- Formula
- This field can be used to create custom scoring guidelines for other Multiple Choice fields within the survey.
- Label
- This will create a short, bolded field of read-only text within the survey.
- Most often used to include section headers within longer surveys.
- Long Answer
- This will create a field for the client to enter as much text as needed.
- Multiple Choice
- This will create a field in which the user can select MULTIPLE answers from a checklist of options.
- Number
- This will create a field in which the client can select a number by clicking on up/down arrows.
- You can set parameters for the minimum and maximum values for which the client can select and the increments in which the numbers should increase (e.g., Min Value = 5; Max Value = 50; Increments = 5).
- Rich Text Field
- This will create a block of formatted read-only text within the survey.
- Most often used to create custom consent text and/or provide the client with other practice information.
- By clicking on the “Expand Editor” button, a larger window will populate to make the editing process easier.
- Short Answer
- This will create a field for the client to enter a limited amount of text.
- You can choose to have the survey pre-populate with the client’s first name, last name, or phone number saved in their client profile by using the “System Variables” dropdown and checking “Pre-Fill from Database”
- By selecting the “Read-Only Field” checkbox, the client will not be able to edit the pre-populated text.
- Signature
- This will create a field for the client to e-sign the survey.
- Single Selection
- This will create a field in which the client can select only ONE answer from a list of options.
- When adding a new element, it will automatically be selected for customization within the “Edit Element” column.
- You can preview your survey from the perspective of the client at any time by pressing the
button.
STEP 4: Configure the survey settings by clicking on the Advanced Options tab 
- You can edit the survey name within this tab at any time.
- Click the “Active” checkbox” to make this survey available for your staff to send to their clients.
- Click the “Available on Client Portal” button for surveys that should be immediately available for ALL clients within their portals.
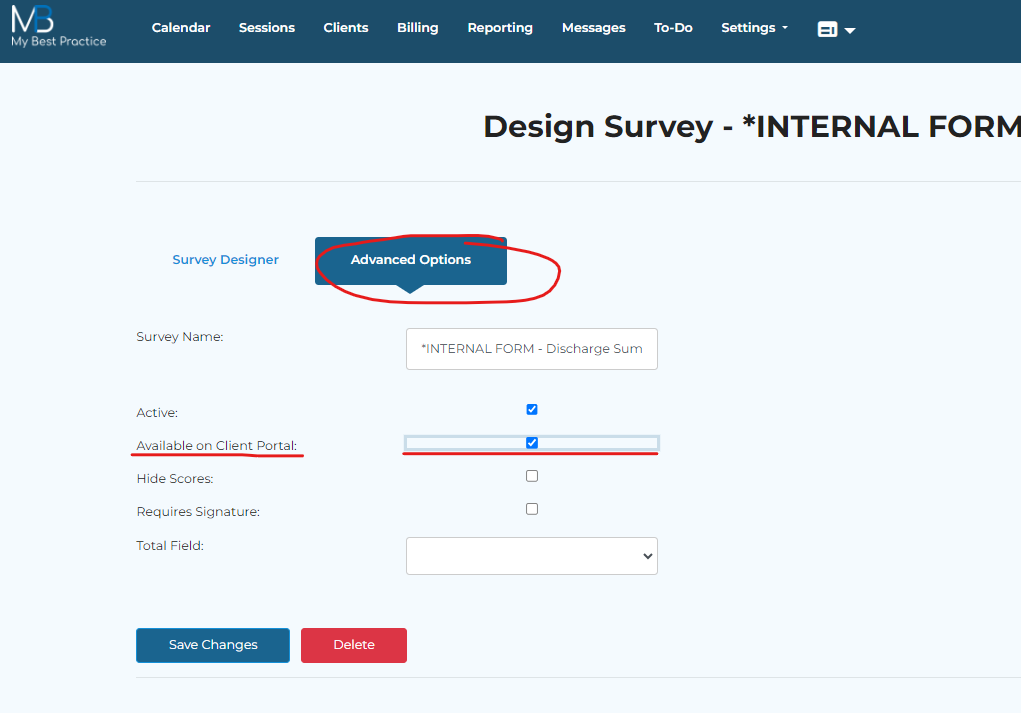

NOTE: This feature is most often used for consent documents that need to be completed by ALL clients (e.g., Acknowledgment of Privacy Policies). You can also use this feature to make various questionnaires available for clients to complete as many times as they’d like within their client portals (e.g., client satisfaction surveys, weekly therapy goals, etc.).
- Total Field: Any formula elements added to the survey will be available for selection here.
- This selected Total Score will appear on the quick view of the clients' Survey Responses.
- When you’re done designing your survey, click the Save Changes button to return to the Surveys & Packets tab within the Account Settings section.
STEP 5: Create packets to easily send multiple surveys at one time.
- Within the Surveys & Packets tab, click on the Packets header on the right-hand side.
- Click the +Add New Packet button.
- Properties tab
- Packet Name → This will be the name staff members see when sending out the packets to clients AND the name that clients will see when navigating to the “Packets” tab to complete them within their client portal.
- Packet Description → Give a brief description of what is included in the packet. Note: this description is only seen by your staff.
- Email Subject → This is the subject of the email if this packet is configured to be sent out automatically for a specific cohort.
- Email Body → This is the body of the email if this packet is configured to be sent out automatically for a specific cohort.
- Intake Packet Checkbox → Check this box if the packet you are creating is going to be sent out during the client intake process.

The “Intake” column icons within the Clients list will update under the following circumstances:
- The intake packet has NOT been sent to a client → .X.
- The intake packet has been sent to a client → .X.
- The intake packet has been completed by a client → ✅

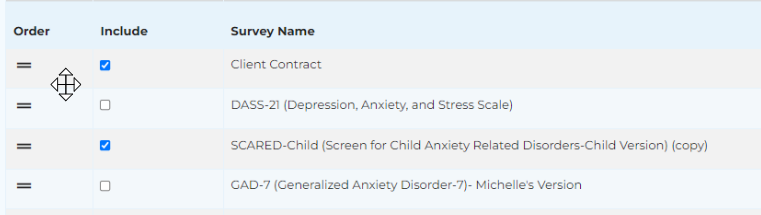
- Click on the Surveys tab on the left-hand side to select the surveys that should be included in the packet.
- You can customize the order of the selected surveys by hovering over the survey within the Order column and dragging it to the desired position.
Related Articles
Cloning Forms/Surveys
Step 1: Navigate to Account Settings, then go to Surveys & Packets. Step 2: Select Clone on the survey you want to duplicate. This will allow you to make minor adjustments without altering the existing live form or survey. Step 3: Rename the Survey ...Surveys to Review within To-Do List
Step 1: Navigate to the To-Do List page by selecting the To-Do tab from the main screen. Then, select Surveys to Review. Step 2: Use the filters to search for the appropriate surveys. Step 3: Select review/sign to review and sign the survey. To ...Sending Surveys/Packets to Client
In order to send surveys/packets, you'll first want to create them by following the instructions here: Designing Custom Surveys/Packets You can also send any of our free Global Surveys. Step 1: Navigate to the Surveys tab within the desired client’s ...Sending Surveys/Packets to Clients
In order to send surveys/packets, you'll first want to create them by following the instructions here: Designing Custom Surveys/Packets You can also send any of our free Global Surveys. Navigate to the “Surveys” tab within the desired client’s ...Professional Counter-Sign for Completed Surveys
Step 1: Create a Survey by following the instructions here: Designing Custom Surveys Step 2: Click on the survey you've created, and then go to Advanced Options. This section will provide you with additional choices and settings to customize your ...