Generating Invoices/Superbills in the Client Portal
STEP 1: Navigate to the Payment & Invoices tab within your client portal.
STEP 2: Click on the Generate Date Range Invoice button.
STEP 3: Select the appropriate timeframe for the receipt/invoice/superbill that you would like to generate by clicking on the dropdown on the left-hand side.
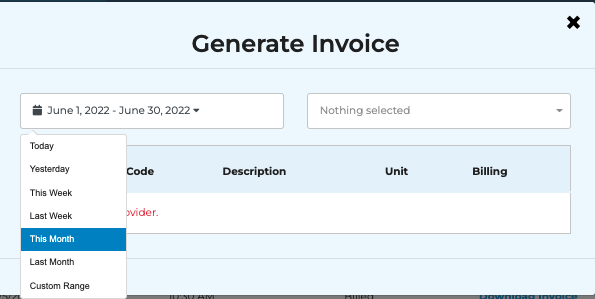
**If you want it to span multiple months, click on the "Custom Range" option and then select the appropriate timeframe.
STEP 4: On the right-hand side, select the appropriate professional from the dropdown.
STEP 5: Any applicable sessions within the timeframe selected will then populate below. These will all be included on the invoice created.
STEP 6: (If applicable) select 'Make this a receipt including payment(s) to show payments made within the date range.
STEP 6: Click on the Generate Invoice button. The document will then automatically begin downloading within your browser.

Any invoices that you have already generated (or that have been created for you) will be available for future access within the Payment & Invoices tab.
Related Articles
Instructions for Generating Superbills/Invoices (EMAIL TEMPLATE)
Instructions for Generating Invoices/Superbills Within your client portal, you will have the capability to generate invoices/superbills as frequently as you'd like (weekly, biweekly, monthly, bimonthly, etc.). In order to do so, please see the ...Creating Invoices/Superbills
Please note: "invoice" is synonymous with "superbill." STEP 1: Ensure your account settings are configured correctly. (FAQ: Configuring Invoice Settings) STEP 2: Ensure the necessary client details are correctly input into their client profile and ...Client Portal Guide: Portal Permissions
Basic Functions - Enables the portal user to access the overall portal settings, ability to view the "Client Portal Banner Message" from the practice and/or the specific professional, view the "Upcoming Appointment" banner, and interact with the ...Client Portal: View Upcoming Appointments
Now, clients can view a list of upcoming appointments by selecting the More button on the right-hand side of their Next Appointment on the client portal.Client Portal: Making Payments
Please note: some practices may not have this setting enabled. If you do not see the "Pay Now" button, please reach out to your provider to initiate a payment. To make a payment, navigate to the Payment & Invoice tab ➡️ select Pay Now ** Partial or ...