Configuring Practice Settings
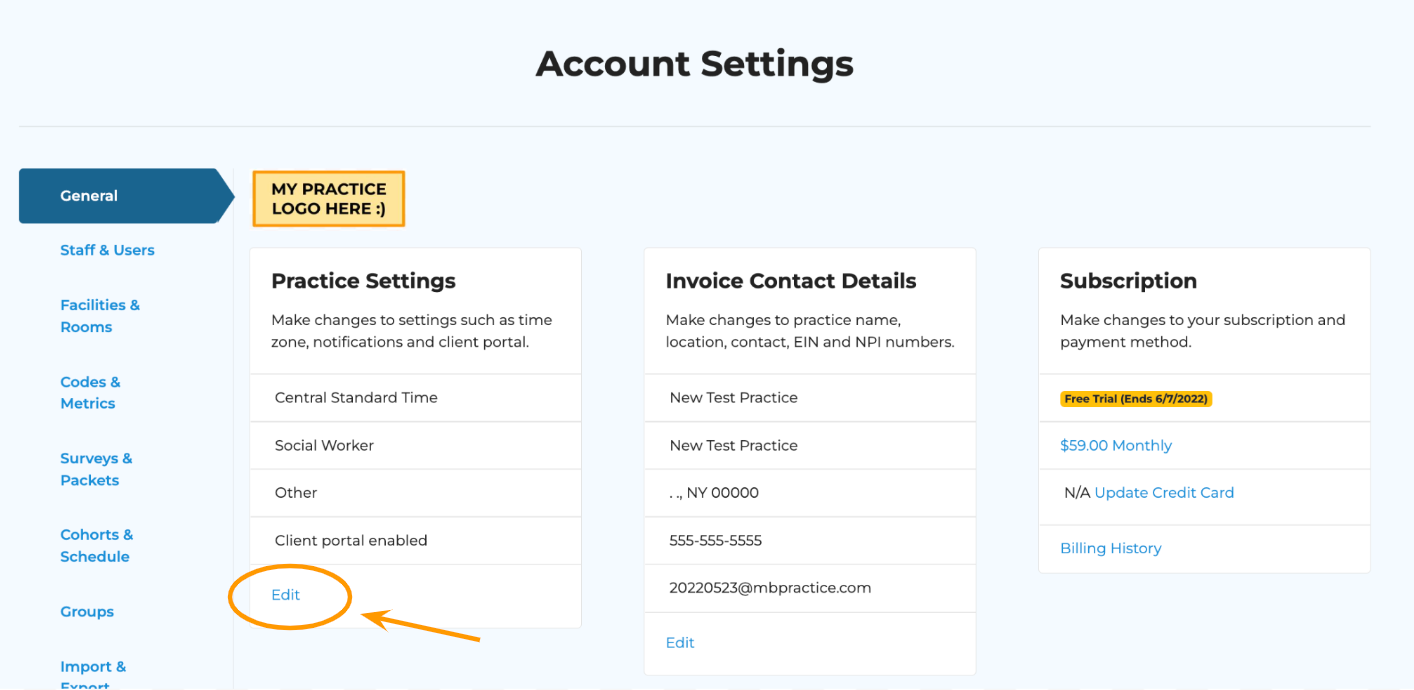
Navigate to the Account Settings section of your account.
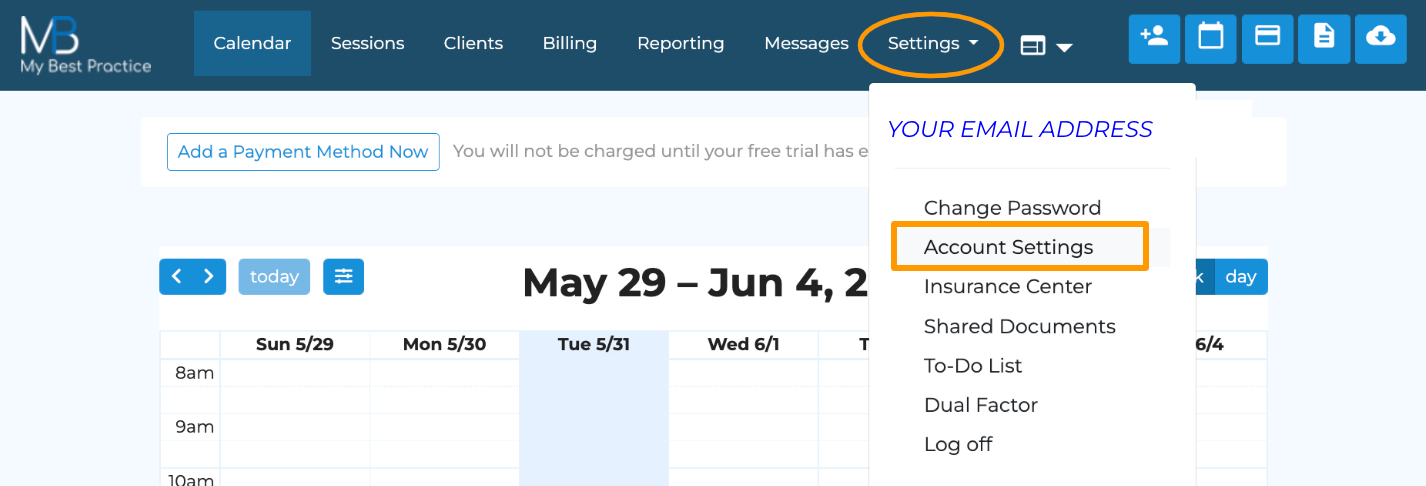
Click on the “Edit” button on the “Practice Settings” bucket within the General tab.
DEFAULT TAB
Include Group Appointment on the Scroll
This will display group note(s) when scrolling through a client chart where applicable.
Enable Session Note Lock Word Confirmation
This feature will require typing the word ‘lock’ to lock the note.
Required Fields When Marking Session as Missed
Requires the reason text box to be completed when marking a session as missed.
Uses Supervision
How-To: Supervisory Features
Client Display Name
This is what will be displayed if you utilize the Google Calendar Sync or if you choose to "Hide Names" within MBP in your calendar settings.
Calendar Amount Display
Total Outstanding Balance Due - includes all balances i.e., insurance.
Total Client Balance Due - clients balance not including insurance balance
Calendar Border Color
Allows for custom border colors on the calendar
Allocation type
All practice’s should have Uses Allocation selected. No Allocation is not common.
Billing Default View
You can choose to have the Billing tab default to one of the following:
By Transaction = A chronological ledger of every billing transaction (billed/missed appts and payments)
By Appointment = All appointments will be listed and the status will change accordingly based on the status of the specific appointment (Billed, Missed, or Paid)
Time Zone
This will be the default time zone for all staff members’ calendars.
Session Timeout (minutes)
For security purposes, enter the desired duration of inactivity (in minutes) before your staff is automatically logged out of the system.
INVOICES TAB
Hide Other Professionals
Check this button if you don’t want to see other professionals billing
Enable Future Invoicing
Check this button if you want to be able to create invoices for future appointments (this is uncommon).
Uses Invoice Numbers
Check this button if you want the system to automatically generate an invoice number.
Shows Prior Balance
Check this button if you want invoices to include prior balances.
Auto-generate previous month’s superbill on the…
More info here: Setting Up Automatic Monthly Superbills
Invoice File Name Prefix
Complete this box if you want to add a name to the beginning of the invoice file.
Default Invoice Options
Make this a receipt including payment(s)
Check this button if you would like to display client payments on the superbill/invoice.
Display Billing Address
Check this button if you would like for your clients’ superbills/invoices to reflect the billing address of your practice.
Display Facility Address
Check this button if you would like for your clients’ superbills/invoices to reflect the specific facility address selected during the appointment creation.
Display Client Address
Check this button if you would like for your clients’ superbills/invoices to reflect the address entered for the client.
Display CPT Description
Check this button if you would like for the CPT Description entered when creating your CPT codes (e.g., individual psychotherapy; group therapy; etc.) to be included on the superbills/invoices.
Display Signature
Check this button if you would like for your superbills/invoices to include the signature you've entered into your Staff & User settings.
Display Diagnosis Code
Check this button if you would like for your superbills/invoices to include the diagnosis code you’ve entered in the client diagnosis tab.
CLINICAL TAB
Select the appropriate options from the various dropdowns
These will be the default templates selected for all client notes/case conceptualizations/treatment plans/intake interviews.
They can be adjusted for each specific client note.
MISSED REASONS
You can enter the default rate that should populate when selecting the specific missed reasons for an appointment.
For example, if my policy states that the client will incur a $100 fee for late-cancelled appointments, I would check off the button next to Late-Cancelled and enter $100 as the default amount.
These can always be adjusted when marking a specific appointment as missed.
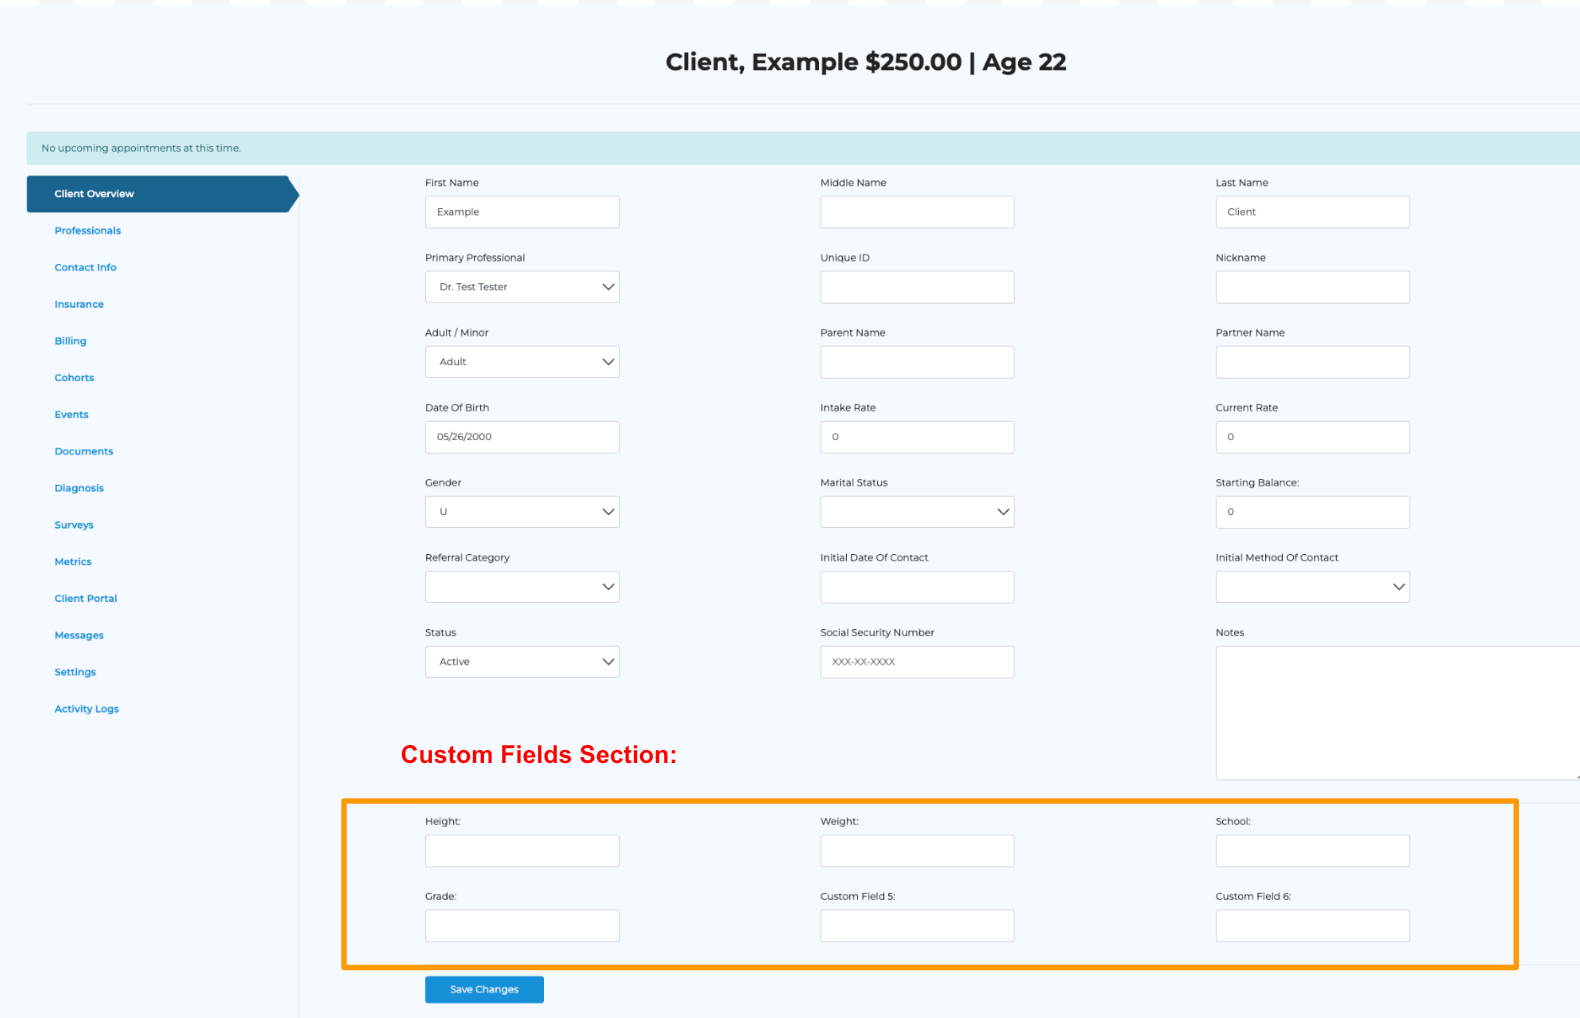
CUSTOM FIELDS
You can customize up to 6 additional fields to be added to your clients’ profiles.
AUTO-TEXT
You can customize your auto-text groups by checking off any groups you do not want to see in the session note.
DEFAULT RATES
You can enter the default rate that should populate when selecting the specific CPT code for an appointment. This can also be overridden at the professional or client level.
CLIENT PORTAL
Enroll Client in Portal by Default
Check this off if you want the system to automatically enroll clients in the portal.
Use Client Nickname as Preferred Name on the Client Portal
Check this off if client nicknames should be the default name in the client portal.
Enable Client Messaging
Check this off if you want to communicate with clients through our messaging feature.
Enable Booking Widget for Existing Clients
How-To: Create Your Booking Widget
Enable Client Invoicing
Check this off if you want to allow clients to create their own superbills
Allow Payments on Client Portal
Check this off if you'd like your clients to see a "Pay Now" button within their portal to submit payments whenever they'd like.
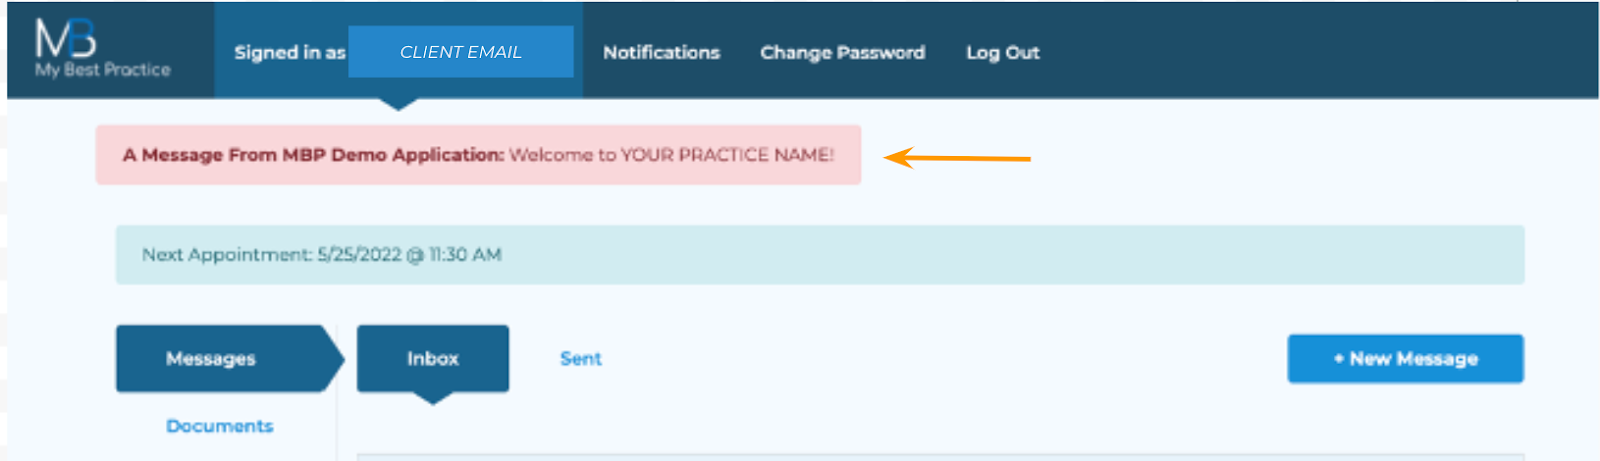
Client Portal Banner Message
If you would like for all clients to receive a default message upon logging into their client portals, enter the message here.
Here is an example of how it will appear within the client’s portal.
INSURANCE
Professional Insurance Signature Requirement
Professional’s File - select this option to use the client’s default professional’s signature
Session Note - select this option to use the professional signature from the session note
Enable Auto-File Claims
check this box to initiate auto-file claims. Claims that are ready to be filed will no longer appear in Pending and will automatically land in processing. Claims that are missing any required items will be pending.
Clients allowed to enter insurance
Check this box to allow clients to enter their insurance information on the client portal.
Auto Post Insurance Payments & Denials
check this box to initiate auto post payments and denials
Auto Post Insurance Write-offs
Check this box to initiate auto post write-offs (must have auto post payments and denials checked off first)
NOTIFICATIONS
Enable Appt Reminders/Days Before
Check this button if you’d like your clients to be able to opt into appointment reminders via text and/or email.
Note: Either you or the client can turn on appointment reminders for as many phone numbers/emails as desired.
Enter the number of days prior to the scheduled appointment that you’d like for your clients to receive the text reminders.
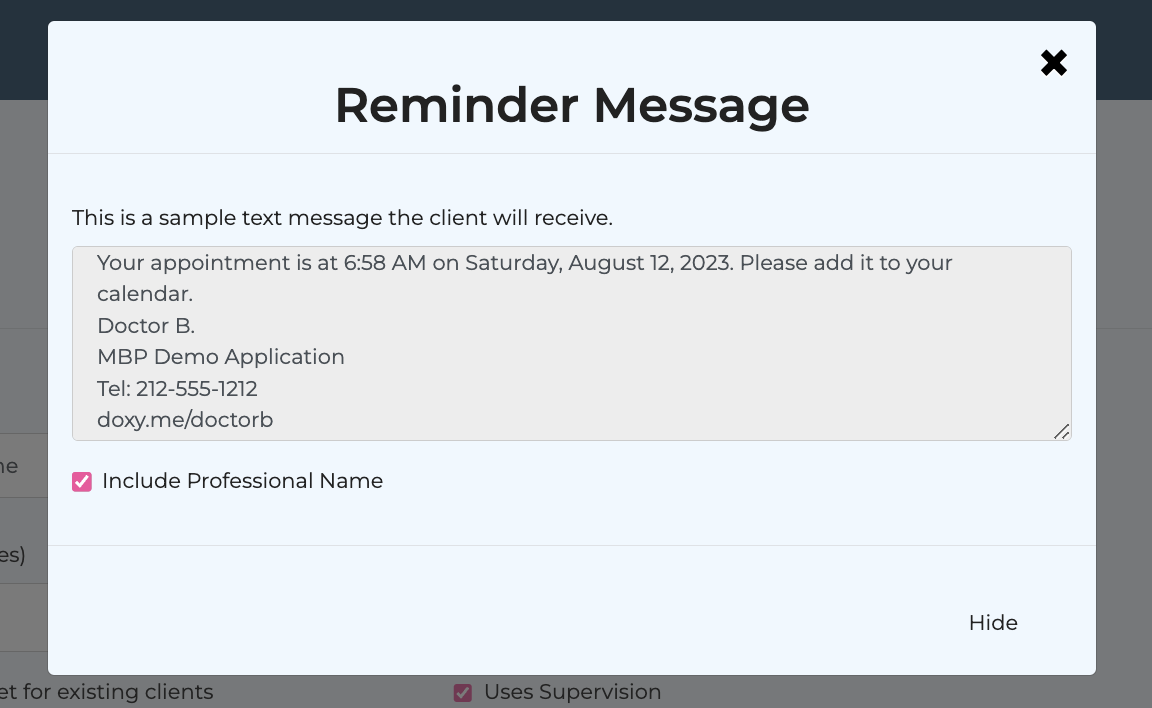
You can click on the blue icon to view a preview of your reminder message.
Enable email notifications for reviewing surveys
By enabling this feature, you will receive an email notification whenever a new survey has been completed by one of your clients. You can then login and access the Surveys to Review tab within the To-Do List to view which surveys have been submitted.
Notify on Client Document Upload
Enable Client Balance Report (notification email)
Override Insurance ERA Notifications Email
Enable Autopay (notification emails)
Check this button if you’d like to enable Auto-Pay on your account.
Please note: Auto-Pay will run each night. If you enter an email address in this field, about an hour before the charges are processed, you will receive a pre-autopay report notating everyone who is due to be charged.
In the text field, include the email address of the user who should receive the transaction list for ALL auto-payments due to be charged each evening.
Enable Client Balance Notification
Weekly
Monthly
TELEHEALTH/AI NOTES
Telehealth
Clinicians Can Enroll in Telehealth
select this option to give all clinicians the ability to enroll/unenroll in telehealth.
Clinicians Can Enable Telehealth Session Recordings
select this option to allow all clinicians to enable/disable telehealth session recordings.
Alert Clinicians Before Session Ends (Minutes)
This option will initiate an alert minutes before a telehealth session ends.
AI Notes
Use AI Notes
select this option to enroll in AI notes
Require Approval for AI Notes
select this option to require clinicians to get approval to use AI notes
Delete Recording After Processing
select this option to automatically delete session recordings once the note has been generated.
Overwrite Existing Note
select this option to overwrite any existing note with the AI note.
Individual Session
Format for AI-Generated Note
Session Note Type for Auto-Saved AI Generated Notes
Field for Saving AI-Generated Note in Selected Session Type
Group Session
Format for AI-Generated Note
Session Note Type for Auto-Saved AI Generated Notes
Field for Saving AI-Generated Note in Selected Session Type
Staff Group Session
Format for AI-Generated Note
Session Note Type for Auto-Saved AI Generated Notes
Field for Saving AI-Generated Note in Selected Session Type
Related Articles
Configuring Invoice/Superbill Settings
Please note: "invoice" is synonymous with "superbill." Navigate to the middle bucket within the General Account Settings tab (found in the "Settings" dropdown) entitled "Invoice Contact Details" and then click the Edit butto Ensure all of your ...Selecting a Migration Package
Selecting a Migration Package Step 1: Login to your MBP account, and click "Add a Payment Method Now" Step 2: Go to Account Settings within the Settings dropdown. Step 3: Click the Import Center tab on the left-hand side and select the migration ...Self-Migration Guide (Setting Up Your Account)
To begin your self-migration, please use the following guide. Step 1: Enter a payment method for your subscription. **Your card will not be charged until your 14-day free trial period has ended. Step 2: Export all of your data from your previous EHR ...Practice Time Zone Update
Step 1: Go to Account Settings, and then click Edit on Practice Settings. Step 2: Choose your preferred time from the Time Zone dropdown box and then click Save Changes.Default Rates - Practice Level
Navigate to Settings - Account Settings. = Select the edit link under Practice Settings. Navigate to Default Rates. Now, choose the service(s) you want to default using the dropdown. Once completed, select Add. Then, add your default rate(s) and ...